
In this post, Ben Dare tries to persuade you that macros can be your allies and aren’t too mysterious really. Ben starting using macros very soon after becoming a CIEP member and finding out about them for the first time; he hasn’t looked back.

Macros: More familiar than you may think
A macro is a way of giving Word a job to do, to make it easier for yourself.
We all do this anyway: take a simple yet essential job like starting a new line.
There, done.
I could have used tabs to move the cursor to the next line, or even spaces! But I have little doubt that all readers of this blog know that Enter tells Word to do the job quickly. Time and faff saved.
Now, inserting a new line with Enter is not called a macro – it’s an inbuilt Word function. But in many ways, a macro is just the same, only it’s a job that’s not inbuilt. You get to choose it.
Let’s say a project has inconsistent quote marks, and we need to change the single quote marks to double. Given the possibility of quotes within quotes, and the other uses of the closing single quote mark (apostrophe), using a global change here is asking for trouble. For argument’s sake, we’ll also assume there are other things we’re looking for as we scan through the document, so we aren’t keen to do endless rounds of item-by-item find and replace. It’s going to be done as we read.
So each time we spot one, we:
- place the cursor on the mark
- delete it
- type in the new mark
- go to the second mark in the pair
- delete it
- type in the new mark.
That’s a fair amount of clicking and tapping. Instead we could try a macro: PunctuationToDoubleQuote (to use this or any macro, you need to add it to Word and likely give it a shortcut – and we’ll cover those steps below). Now all we need to do is:
- make sure the cursor is somewhere before the first quote mark
- run the macro (by typing the keyboard shortcut you’ve assigned to the macro, like Ctrl+Alt+2)
- run it again for the second quote mark in the pair.
Every time you run the macro, the next quote mark after your cursor will automatically change from a single to a double quote mark. That’s an example of a macro that makes one change a bit easier, and there’s a macro to do it the other way round too (PunctuationToSingleQuote).
Note: this post was created using Word 2016/Windows 10. Users with other set-ups may have slight differences. Notably, Mac users will want to use ⌘ and Option instead of Ctrl and Alt. Most of the macros here work the same, but for the exceptions there is usually a Mac version available. You can often find them by reading the entry in Paul Beverley’s book, starting with the final paragraph of the general introduction.
A tool for (almost) every occasion
There are other jobs very familiar to you, which take a few clicks/taps or more, that a macro can help do quickly and accurately:
- swap two letters/words (SwapCharacters; SwapWords)
- google a word, or use an online dictionary (GoogleFetch; DictionaryFetchByLanguage)
- (un)capitalise the next letter (tracking optional) (CaseNextChar)
- add quote marks, or parentheses, around some text (AddQuotesDouble; ParenthesesAdd).
… and so many more. They are all simple jobs, but take a little bit of clicking/tapping. A macro can do it with one keystroke.
Then there are jobs that you simply might not easily be able to do without a macro or other specialist software:
- ask Word what a particular character is, and what’s the code to reproduce/search for it (WhatChar)
- analyse a document for inconsistencies in general approaches to numbers, spelling, language, abbreviations and more (DocAlyse)
- get a table of hyphenations, showing possible inconsistencies (HyphenAlyse)
- find capitalised words that are spelled slightly differently, to help check whether one of the spellings is wrong (ProperNounAlyse).
These macros don’t edit your document, but provide information about it. This helps you make consistent choices from the beginning.
There are tons of macros available but don’t be put off by the choice. Try one. And when using one becomes natural, another can easily be added, and another – the time saved adds up.

How to get one and use it
A beginner will likely get macros in two main ways:
1. Use one someone else has made
A great place to start with this is CIEP member Paul Beverley’s huge, free repository that he introduces here: http://www.archivepub.co.uk/book.html. The introductory pages and ‘Favourite tools’ might help you know how to find what you’re looking for, and instructions are included. In this blog I’ve used macros from this repository.
But internet searches are also your friend. There are other macros out there to be found, although you may need to pay for some.
Once you’ve found one, it’s time to add it to Word and give it a shortcut. Let’s add PunctuationToDoubleQuote:
- go to https://www.wordmacrotools.com/macros/P/PunctuationToDoubleQuote.txt
- select the whole text – a macro always needs its ‘Sub’ top line and its final ‘End Sub’ – and Ctrl+C (or copy it)
- in Word, either press Alt+F8 or go to the View tab and click the Macros button to bring up the Macros menu window
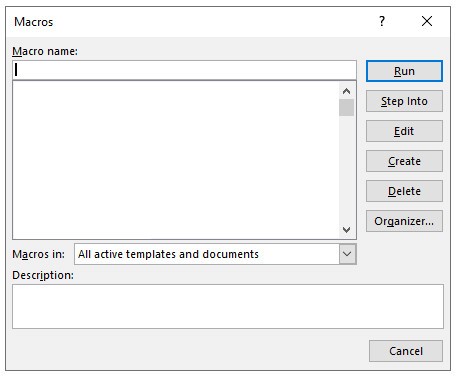
- in ‘Macro name:’ type in ‘temp’ (as because you’re using a ready-made macro, you’ll be changing this)
- click ‘Create’
- you’re now in the macro library
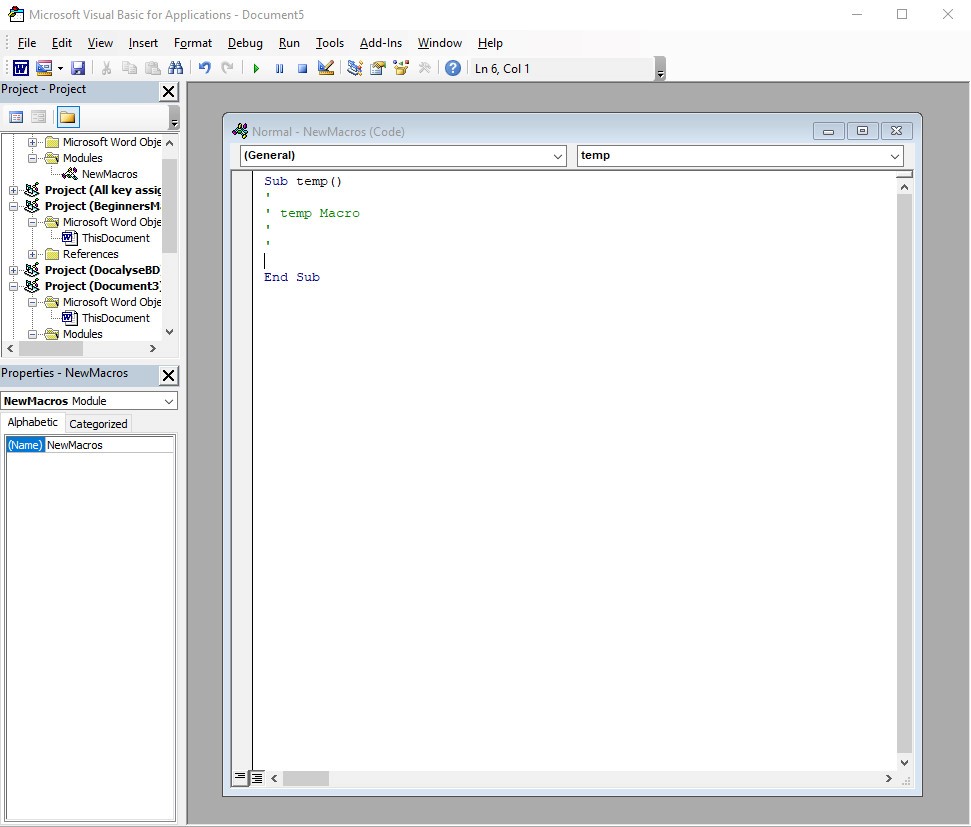
- select the as-yet empty ‘temp’ macro, from the first ‘Sub’ to ‘End Sub’
- Ctrl+V to paste in the full copied macro
- Ctrl+S to save and Alt+Q to close (or use the file menu).
Now that macro is added to your Word, and you don’t need to do that again. Time to give it a shortcut, to make it easy to use (you can always use Alt+F8 and run a macro that way, but it’s not the quickest):
- right-click on some empty space in the top menu ribbon
- click ‘Customize the Ribbon’ to get this option window:
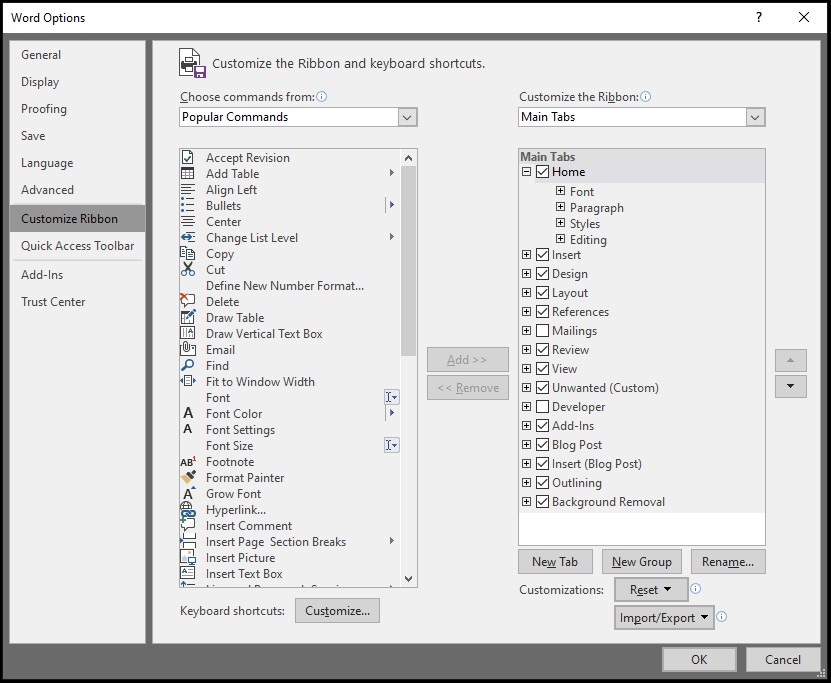 (Tip: You can add any macro to a ribbon tab by choosing ‘Macros’ in the ‘Choose commands from:’ box and then using the ‘Add >>’ button. But I’ll stick to keyboard shortcuts in this post.)
 - to give a macro a keyboard shortcut, click on ‘Customize’ at the bottom, next to ‘Keyboard shortcuts:’
- in this new window, navigate down the ‘Categories:’ list to ‘Macros’ – it’s near the bottom
- choose your macro in the list (it’s now got its full name)
- click in the shortcut box and type in your shortcut; I’ve chosen Ctrl+Alt+2 as ‘2’ is the key with the double quote on it (UK keyboard)
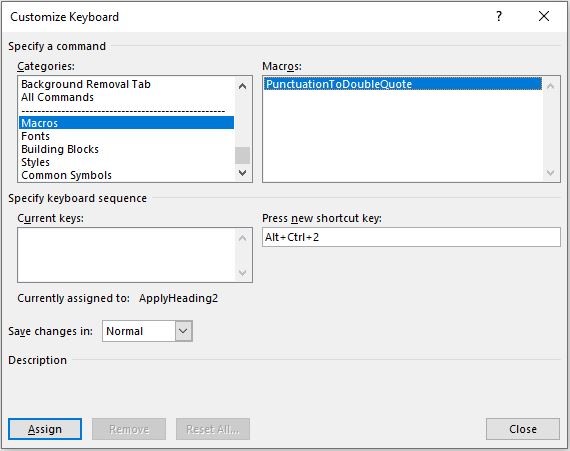
- check for Word telling you that’s already in use. You can see my shortcut is already assigned, but I don’t use that one, so happy to override. You can choose another if preferred
- click ‘Assign’
- click ‘Close’.
That’s the keyboard shortcut set. Time to open up a test document with some single quotes, and test away!
Tip: to save time in future, the next macro you install could be CustomKeys, to quickly bring up the keystroke customising box!
2. Record them yourself
This may feel scarier than downloading a readymade macro, but the beautiful thing about recording them is that they are tailored exactly to the job you need. And apart from setting up the recording, you’re only doing things in Word that you already know how to do! For instance, I once had to delete a number at the start of certain paragraphs, add ‘PPP’ and a tab instead, and apply a paragraph style. Again a few clicks, and monotonous to repeat. To set up a macro to avoid this repetition, I:
- placed the cursor before the number
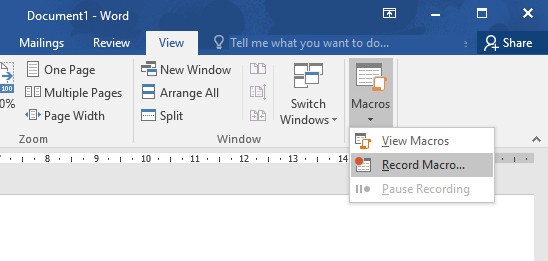
- clicked the View tab
- clicked the dropdown menu under Macros
- clicked ‘Record Macro’
- gave it a name (‘PPP’)
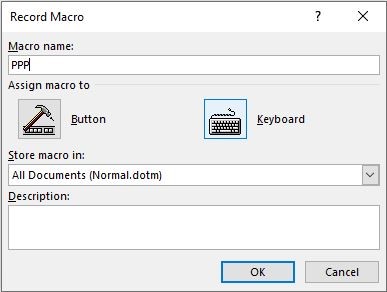
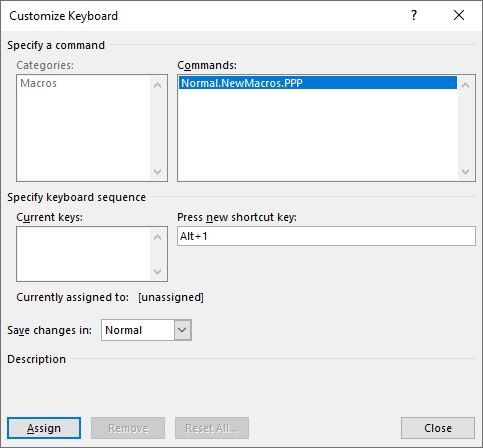
- clicked the ‘Keyboard’ icon to give it a shortcut (‘Alt+1’ is convenient for me), then ‘Assign’ and ‘Close’.
From this point onwards, Word was recording every single thing that I did in the program. The only thing it can’t record is using the mouse to move the cursor or select text – make sure to place the cursor where you want it before recording, and to use the arrow keys to move around or select text. So to make my macro, I simply carried out the steps I wanted Word to record and repeat when I next ran this macro:
- pressed Ctrl + Shift + Right Arrow to select the whole number and following space
- pressed Delete to delete the selection
- typed ‘PPP’, then pressed Tab
- clicked on the appropriate paragraph style button.
Now that I’d completed every task I wanted in the macro, I clicked the square ‘Stop recording’ button on Word’s bottom bar (or back in the Macro dropdown menu in the View tab).
Then, for every other instance where I needed to make this change, I simply:
- placed the cursor before the number
- pressed Alt+1.
I’d never find that macro online – who else would need it? But for a job that needs repeating many times, it saves many clicks and taps, and time. Give it a go!
Tip: for other hints and tips on recording and using macros, members should check out the CIEP’s fact sheet Getting started with macros.
You’re not alone
If you’re part of the CIEP’s forums, there’s a community ready on a macro-specific forum to help each other to find, use and improve macros. One person has a problem, others help find a solution, everyone benefits. And we’re a friendly bunch to boot.
About Ben Dare
 Ben Dare is a Professional Member of the CIEP and copyedits/proofreads for projects on sustainable food systems and sustainable living (and almost anything else when asked nicely). Otherwise, he’s probably playing with Lego or Gravitrax, cooking, running, swimming or (regrettably) doing chores.
 About the CIEP
The Chartered Institute of Editing and Proofreading (CIEP) is a non-profit body promoting excellence in English language editing. We set and demonstrate editorial standards, and we are a community, training hub and support network for editorial professionals – the people who work to make text accurate, clear and fit for purpose.
Find out more about:
Photo credits: leaf by MabelAmber, wooden letters by blickpixel, both on Pixabay.
Posted by Harriet Power, CIEP information commissioning editor.
The views expressed here do not necessarily reflect those of the CIEP.
What a friendly and helpful entrée into faster, reliable editing.
Brilliant, thanks Ben! Such a clear explanation of this area of our professional life, which many editors find intimidating.
Thanks so much Ben! Very helpful and clear. I feel better already Definitely worth putting some work in up front to save lots of pesky fiddles later!
This is incredibly helpful! I am just entering the proofreading world and am still trying to wrap my mind around macros. I followed your steps for recording your own macro and can say I am officially amazed! This will definitely help speed things up and make life a bit less tedious, so thank you!
This was so helpful, thank you! I’m just getting started with macros. I think I’ve nailed how to save and use an existing macro, but I had no idea how to record a macro. I hadn’t realised either that a recorded macro could be used to Mary-Poppinise niggly, repetitive tasks… amazing!
I do have a question if you have time: does the DictionaryFetchByLanguage macro rely on the language settings used in the document? I’m wondering because, if this is the case, it won’t give the right result for a French/German word in a document with UK English as the global language setting. (This situation would be common for me.)