Tag Archives: macros

Talking tech: Clipboards

In this month’s Talking tech column, Andy Coulson looks at getting the most out of your clipboards. There’s more than one, for a start, and they include several tools and functions you might not have known about.

We all use the clipboard frequently: that useful little bit of temporary storage that allows you to copy a bit of text and repeatedly paste it into a document can often simplify repetitive jobs. However, a recent job that meant adding a lot of tags to the text to tell the typesetter how to style the paragraph, like <A> to flag that the current line is an A head, really highlighted the limitations of this and got me looking at whether there might be better ways to do things.

Office clipboard
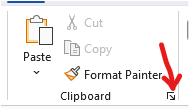
Arrow in clipboard section of WordIn Windows there are in fact two clipboards if you use Office, as that has its own clipboard. The Office clipboard lets you review the last 24 items stored to it. You can access this by clicking on the little arrow in a box in the Clipboard section of the Home ribbon in Word (indicated by the red arrow here).

You then have a sidebar that gives you access to up to 24 items on the clipboard. You can click on these and paste them into your document. When you get to 24 items the next item you copy goes to the top of the list and the bottom item is removed from the list. This means if you are repeatedly using items then your regularly used items can drop off the bottom of the list. Closing all Office programs will also empty the Office clipboard, so if you are doing something like tagging, it is worth keeping a Word or Excel Window open to preserve your clipboard list.

If you are using the clipboard to rearrange text, there are a couple of ways of working around this problem by bypassing the clipboard and keeping its content intact. The first of these uses the mouse. Select the text to move with the mouse by left-clicking and dragging, then move the mouse to where you want to move the text, hold the Ctrl key and right-click once where you want the text to go. Your text will pop up in the new destination. You can also drag the selected text by keeping the left button pressed while moving to the new location.

The other tool is the spike (named after the old-fashioned spike often found on editors’ desks). This allows you to collect several bits of text from the document and put them elsewhere in the document, or in a new document. Imagine you need to rearrange some paragraphs, clipping lines from two or three places to create a new paragraph. Spike will paste all the items you collect as a single block of text, so you need to think about the order you collect the text in. The first item you clip will be the first item in the pasted text and so on. So, you select the first item and press Ctrl+F3. This cuts the item to the spike, but if you want to copy, just press Ctrl+Z after: the item is still on the spike, but remains in its original place too. When you have collected all the pieces you want, place the cursor where they are going (or open a new document) and press Ctrl+Shift+F3 to paste all the items.

Someone typing on a laptop

Windows clipboard

Windows also has a clipboard that operates in a semi-detached fashion from the Office clipboard. Historically this also had a clipboard history tool which disappeared at some point, but is now back in Windows 11. It can be enabled by going to Settings, System, Clipboard and turning ‘Clipboard history’ on at the top of the list. Ctrl+V will then bring up the Windows clipboard history.

You can paste directly from here into Word, and this material is saved even when your Office programs are closed. You will notice, if you have Office clipboard open, that the items copied from the Windows clipboard appear in the Office clipboard. This can be a bit confusing, and I’m not entirely sure about the rationale of having two clipboards – I’m assuming it is for compatibility with the Mac version of Word.

Windows 11 clipboard history

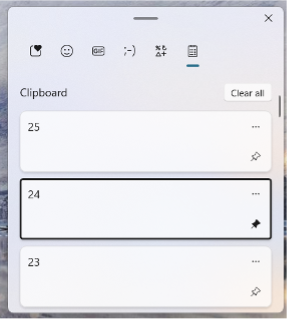
The Windows 11 clipboard history (shown here) has a couple of potentially useful tools. Firstly, you can see that there are various icons across the top. Perhaps the most relevant is the symbols one, second from the right. This is like the ‘Insert Symbol’ command, giving access to all the available symbols for the current font. The other is that you can pin items to the clipboard, by clicking on the little pin to the right of each item (24 in the list in the image is pinned). These are saved until you clear them and are saved in addition to the 24 items in the Windows clipboard, although if you paste into Word they will take up one of the 24 slots in the Office clipboard. You can use this as a way of saving regularly used items (like my tags) and bringing them back into the Office clipboard when you need them. You probably won’t be surprised to learn that there is a macro that does something similar, and I’ll touch on that below.

Useful macros

One particular macro, CopytoClipboard, was discussed on the forums here – contributed by James Baron with a bit of refinement from Paul Beverley. What this does is let you create a Word file and, with the Office clipboard sidebar open, it will populate the clipboard from the file. This is what I ended up using to tag my file. If things dropped off the bottom of the list, I could clear the clipboard and reload from the file. It meant I had a list of tags I could click on to insert, and could import with the correct formatting.

It is also worth looking at Paul’s FRedit macro (or Windows Find and Replace if there are only one or two patterns) to see if there is a pattern you can find to do the pasting or formatting for you. In my tagging example, if there had been numbered headings, you could potentially have searched for heading styles or the pattern of numbering and added the tags automatically. Even if that was only 90% correct in a long manuscript, that could still be a significant time-saving.

Clipboard extenders

Finally, there are various clipboard extender programs that add to the functionality of the clipboard. I have used ClipX in the past, but this hasn’t been updated for several years, so I wouldn’t recommend it. This allowed the clipboard to have more capacity as well as providing ‘stickies’, which were like the pinned items in the Windows 11 clipboard, but were presented in a really useful pop-up menu.

There are many others available, but going by most of the reviews, I have so far avoided trying any, as I think they may actually cause more issues than they solve. If anyone has tried any and rates them, please let me know in the comments, and we can perhaps have a round-up in a future column.

I realise I have not touched on the Mac clipboard, for which I apologise as a non-Mac user. However, the bit of reading around I have done suggests the situation on the Mac is similar. Again, if anyone would like to share their Mac experiences in the comments, we can perhaps revisit this.

To sum up, the clipboard is really several clipboards that operate in similar and overlapping ways. On Windows 11 with Office you have a number of tools for cutting, copying and pasting text that work pretty well. Things start to get a bit trickier if you have to copy and paste a larger number of items frequently – as in my tags example – where copying from another document each time is slow and creates a lot of wear and tear on your mouse hand. It is worth spending some time exploring whether there are better ways of doing this to improve your efficiency and look after your wrists.

About Andy Coulson

Andy CoulsonAndy Coulson is a reformed engineer and primary teacher, and a Professional Member of the CIEP. He is a copyeditor and proofreader specialising in STEM subjects and odd formats like LaTeX.


About the CIEP

The Chartered Institute of Editing and Proofreading (CIEP) is a non-profit body promoting excellence in English language editing. We set and demonstrate editorial standards, and we are a community, training hub and support network for editorial professionals – the people who work to make text accurate, clear and fit for purpose.

Find out more about:


Photo credits: header image by Pixabay, someone typing on a laptop by Breakingpic, both on Pexels.

Posted by Eleanor Smith, blog assistant.

The views expressed here do not necessarily reflect those of the CIEP.

The editing workflow: Pre-editing tasks

In this blog post, three experienced editors explain what they do in between receiving a manuscript and properly getting stuck into editing the text. From running macros and styling headings, to checking references and making sure the brief is clear, tackling certain jobs before starting to edit the text can improve and speed up the whole editing process.

Hazel Bird

For me, the stage between receiving a manuscript and properly starting to copyedit the text is about two things: (1) ensuring I have a solid understanding of what the client needs me to do and (2) proactively identifying any problems within the manuscript so I can get started on fixing them straight away.

So, for step 1, I’ll do things like:

  • checking the manuscript matches what I was told to expect in terms of word count and components
  • checking I have all the necessary briefing materials and instructions from the client
  • checking I understand the context in which the project will be used (eg for an educational project, the level of qualification, the ability range of the students, where they will be geographically and any other resources they might use alongside this one)
  • reminding myself of the details of the agreed level of service and any special aspects of the work
  • getting in touch with whoever will be answering queries on the text (if they aren’t the client) to introduce myself and agree how the query process will be handled.

If there are any discrepancies, ambiguities or stumbling blocks, I’ll write back to the client straight away to open a discussion.

For step 2, I’ll start digging into the actual text but on a holistic, overarching basis. I have a load of macros that I run to clean up the formatting and highlight things I’ll need to check or fix later, during the in-depth edit. I’ll then style the text’s major headings so that they appear in the Navigation Pane in Word (I find this bird’s-eye view of the manuscript essential as it speeds me up and helps me to identify big-picture issues). At the same time, I’ll examine the structure and check it fits with any template or scheme I’ve been given by the client. Next I’ll run PerfectIt to fix some more style basics and begin to compile a style sheet with what I’ve found.

My final task within step 2 is to edit the references. A lot of my work is with clients whose authors don’t handle referencing every day, so I frequently find issues with reference completeness or even technical issues with the entire referencing system. Identifying such issues early on means there is time for everyone involved to discuss how to proceed in a relaxed manner, without time pressure. And, from an editing point of view, I find editing the main text goes so much more smoothly when I know the references are already spick and span.

The result of all of the above tasks is that once I get started on the main text, I should have minimised the number of surprises I’ll find and thus maximised the chance of the project being completed without hiccups and on time. I will also have fixed or flagged (to myself) as many routine, repetitive tasks as possible so that when I get into the actual line-by-line editing, I can devote the majority of my attention to flow, clarity, accuracy and whatever else the client wants me to refine – in other words, the parts of the editing where I can really add value.

Hester Higton

Exactly how I start work on a manuscript depends on the length: I’ll do things differently for a journal article and a lengthy book. But my rule for any project is to make sure that I’m batch-processing, so that I use my time as efficiently as possible.

If I’m working on an article for one of my regular journals, I’ll start by making sure that the file is saved using the correct template. Sometimes this will be one supplied by the client; if they don’t have a preferred one, I’ll use one of my own that eliminates all extraneous styles.

Then I’ll run FRedit. I have customised FRedit lists for all my repeat clients. These not only deal with the standard clean-up routines but also adapt the document to the preferred house style. I use different highlight colours to indicate aspects I want to check (such as unwanted changes in quotations) and I’ll run quickly through the document to pick these up. As I’m doing that, I’ll make sure that headings, displayed quotations and the like have the correct Word styles applied to them.

Next on my list is PerfectIt, which allows me to iron out remaining inconsistencies in the text. I use a Mac so I can’t customise my own style sheets, but the new Chicago style option has made my life a great deal easier!

After that, if the article uses author–date referencing I’ll cross-check citations and references, flagging missing entries in each direction. I’ll style the references list and either note missing information for the author or check it myself if I can do so quickly. If all the references are in notes, I will run a similar style check, editing the notes themselves at the same time.

Finally, I’ll look at the formatting of any tables and figure captions to make sure that they match the house style. I may well edit the captions at this point, but leave table content until I reach the relevant point in the text.

If I’m working on a book-length project that doesn’t have a fully defined style, I’ll start by running PerfectIt. That allows me to make decisions about spellings, capitalisation and hyphenation, all of which I note down on a word list which I’ll return to the client with the completed project. That’s followed by a more basic clean-up FRedit check. I’ll also format figure captions and tables throughout the book at this point. And if there’s a whole-book bibliography, I’ll check that and style it. But I’ll handle the notes separately for each chapter because it allows me to keep a sense of the subject matter in them when I’m working on the main text.

Katherine Kirk

The pre-editing stage is actually one of my favourite steps in the process, and I usually pair it with some great music to see me through. My whole pre-flight process takes about two to three hours, depending on the formatting and size of the document. I work mainly with novels from indie authors and small publishers, so I don’t have to worry too much about any references or missing figures and tables. Some publishers have their own template they want me to apply or some specific steps that they like me to take, but here’s what I do for most indie novels that come across my desk.

I start by reviewing our agreement and any extra notes the author has passed along, and I add them to the style sheet. I use a Word template for my style sheet that has all the options as dropdowns, and that saves loads of time.

The next thing I want to deal with is any bloat or formatting issues; these might affect how well the macros and PerfectIt run. I attach a Word template that has some basic styles for things like chapter titles, full-out first paragraphs, and scene breaks, as well as a font style for italics that shades the background a different colour (great for catching italic en rules!). Styling the chapter titles and scene breaks first makes it easy to find the first paragraphs, and check chapter numbering. Then I skim through for any other special things needing styling. I can set whatever is left (which should just be body text) in the correct style. The aesthetics of this template don’t really matter to the client; I use a typeface that is easy for me to read and makes errors like 1 vs l more obvious. I can revert all the typefaces to a basic Times New Roman at the end. I save this as ‘Working Copy – Styled’ just in case the next step goes horribly wrong …

Now that I’ve cleared up the clutter, I ‘Maggie’ the file (select all the text, then unselect the final pilcrow, and copy and paste it into a new document) to remove the extra unnecessary data Word has stored there. It can drastically reduce the file size and helps prevent Word weirdness like sudden jumps around the page or lines duplicating on the screen. If you’ve styled all the elements of the text properly beforehand, you shouldn’t lose any formatting, but be careful! That’s also why I do this as early as possible, rather than risk losing hours of work. I save this file as ‘Working Copy – Maggied’ so I can see if the file size has decreased, and if it’s all working smoothly, this becomes my working file.

I have a checklist of silent changes that I include in the style sheet. I usually start by doing some global replacements of things like two spaces to one, a hard return and tab to a paragraph break (^l^t to ^p), and two paragraph breaks to one (and repeat until all the extras are gone). Some authors like to make their Word documents look like the final book, and they might use extra paragraph breaks to start a chapter halfway down the page. This can cause problems later when the reader’s screen or printer’s paper size is different to what the author had, so it’s got to go!

I run analysis macros like ProperNounAlyse to catch misspelled character names, and I add them to the style sheet. I might also run HyphenAlyse and deal with any inconsistent hyphens in one big swoop. Then I run PerfectIt and work through it carefully, making note of decisions on my style sheet. I review any comments that might have been left in the text by the author, publisher or previous editors, mark them with a query if they still need to be dealt with, and remove the rest.

Finally, all systems are ready to go, and I launch into the main pass.


Resources

Sign up for the CIEP’s Efficient Editing course to learn more about how to approach an edit methodically and efficiently.

Check out the blog posts Making friends with macros and Two editors introduce their favourite macros to learn how to use macros before (or during) an edit.


About Hazel Bird

Hazel Bird runs a bespoke editorial service that sees the big-picture issues while pinpointing every little detail. She works with third sector and public sector organisations, publishers, businesses and non-fiction authors to deliver some of their most prestigious publications.

About Hester Higton

Hester Higton has been editing academic texts for publishers and authors since 2005. She’s also a tutor for the CIEP and currently its training director.

About Katherine Kirk

Katherine Kirk is a fiction editor who has lived all over the world, including China, South Korea, Ecuador, and Morocco, and she’s not done yet. She works on all types of fiction for adults, especially Science Fiction, Fantasy and Literary Fiction. She is a Professional Member of the CIEP.


About the CIEP

The Chartered Institute of Editing and Proofreading (CIEP) is a non-profit body promoting excellence in English language editing. We set and demonstrate editorial standards, and we are a community, training hub and support network for editorial professionals – the people who work to make text accurate, clear and fit for purpose.

Find out more about:


Photo credits: brick wall by Tim Mossholder, glasses on keyboard by Sly, coffee by Engin Akyurt, all on Pixabay.

Posted by Harriet Power, CIEP information commissioning editor.

The views expressed here do not necessarily reflect those of the CIEP

An interview with Paul Beverley: the man behind the macros

Paul Beverley is well known in the editing community as the ‘king of macros’. He has not only devised and developed such indispensable free tools as FRedit, but also provides training via Zoom, on YouTube and in person. Paul talked to the CIEP Information Team about his ‘total and utter obsession’ with macros, and his plans for the future.

How (and why) did you get started with macros?

I joined SfEP (as it was then) 17 years ago after editing and typesetting my own monthly computer magazine for 20 years. The magazine was dying and I was heavily in debt, so I had to find freelance editing work and needed to do that work fast.

For the previous 15 years, I had used a FRedit-like computer program with a Mac, so I got someone to write a version of it in Visual Basic for Word, and from there I set about learning to program my own macros. But I also had to learn to use Word, which I had never used before!

What are your favourite macros? (e.g. the ones you think are most helpful)

Number 1 has to be FRedit. You give it a list of words, phrases or punctuation that you want highlighting and/or changing globally, and FRedit does it in seconds. I simply wouldn’t bother editing without it.

Next it has to be analysis macros such as DocAlyse, ProperNounAlyse and HyphenAlyse, because I love spotting inconsistencies, even before I’ve read a word.

What’s motivated you to be so generous in putting together and sharing all your macros?

Putting together? See question 1 – a selfish desire to earn more quickly.

Sharing? Why not? What have I got to lose by letting others benefit?

Sharing for free? Easy! If I sold them I’d need to employ a team of technical support personnel (there are well over 1,100 macros to support). As it is, people are really grateful when I help them and, if I’m honest, I like it when people say they appreciate me.

Do you have any tips for overcoming a fear of using/reluctance to use macros?

It can all sound rather daunting but if you can get going with just two or three macros, or maybe half a dozen, you’ll save yourself time and that will motivate you to pick up a few more.

That’s the approach in our self-learning offering: ‘Macros from Square One’ (Mac or PC), where you learn how to install a macro into Visual Basic and then you use it, and then you load another one and so on.

Or another low-tech approach is that you can put a special Word file into a folder on your computer, and suddenly, without ever seeing the inside of a computer program, you will have a dozen or more macros ready to use. This is called ‘Macros Free Trial’.

Also, there’s Jennifer Yankopolus’s ‘Macro of the month’, with hints and tips as well as a suggested macro to try each month.

But to really get yourself launched there’s a paid six-session training course run by Jennifer Yankopolus for the EFA: ‘Macros A to Z’. It gets booked up quickly but if you sign up for ‘Macro of the month’ you’ll get the dates of the next course.

What question are you asked most often about macros (and what is the answer)?

Apart from ‘How do I get started?’ (see above), there’s ‘Are macros safe?’ If you are worried about viruses, there’s no need. In Word’s File–Options–Trust Center Settings, keep your setting as ‘Disable all macros without notification’.

If people are worried about messing up a document by using macros, then, yes, this can happen, but only if you misuse a given macro. Any tool needs to be used with care, so follow the instructions and don’t take on something too complicated too soon.

What is the most unusual/interesting request for a macro you’ve had?

Maybe checking, for a PR agency, the length of tweets – 140 characters max (they can be longer now).

Or, in a book about the card game bridge, changing all the special symbols (icons for clubs, diamonds, hearts and spades); the client wanted text: cx, dx, hx, sx.

In another example, someone had to check the totals at the bottoms of columns of figures in a document, and they didn’t fancy typing all the figures into a calculator. One click for each, and the macro checked the addition instantaneously.

Is there any request/need you’ve not been able to make a macro for?

Yes, occasionally, but it’s usually because the request would take too much of my limited available development time for what is perhaps a rather niche application.

The problem is more often the other way around. People want a specific macro, and within the 1,000 macros there is probably one already, but how do you find it? To help, we’ve provided an electronically searchable ‘Macro Menu’.

Have you ever tried to create macros in Google Docs? Would you?

My answers are ‘no’ and ‘no’, in that order. Again, it’s not a matter of pride or principle, just that I’ve got my work cut out trying to support the existing macros and develop new ones that people ask for.

Paul demonstrating his macros at the 2022 CIEP conference

You train people to use your macros. Where in the world has this taken you?

Physically, only to Spain and Canada, but the Spanish editors are so keen on using macros that they have translated some of the macros and some of the documentation for Spain and Central and South America.

When the pandemic hit, I discovered Zoom and so I have been able to train people all over the world. At one stage, I taught people in eight different countries inside five days. And I know of 56 different countries where my macros are being used – and not all for editing in English; there are specific macros on my website for editing in Dutch, German and Spanish, none of which I speak!

And (as a rough estimate) how many people do you think you’ve trained?

I’ve no way of knowing, actually. My YouTube channel has over 1,300 subscribers, if that’s any indication.

You’re now approaching retirement. Will you continue to create and explain macros?

As long as I can, I’ll keep creating macros – it’s a total and utter obsession. But training is not really my forte because I tend to bombard people with all the exciting and time-saving things they could do with macros. Not helpful!

When I’m gone, my macros will still be available, but I became concerned, a few years ago, that all the programming techniques I use to create new macros are locked in my brain. I managed to document many of them in my book’s Appendix 13 – ‘Word Macro Techniques’, and demonstrated some in YouTube videos.

However, in the past few years Word has become even more ‘feature-bloated’ and therefore VBA [Visual Basic for Applications, the programming language used for Word macros], has got slower. I have had to work out tricks to regain the lost speed of some of the more complex macros. These techniques are largely undocumented.

I get a kick from creating new macros but documenting the techniques is a real slog. So if anyone could offer help or inspiration on the documentation front, that would be much appreciated. It would be a shame to lose those tricks when I’m gone. Thanks.

How else will you spend your retirement?

I am now more or less retired from paid editing, but my lovely wife Sue has just been diagnosed with Alzheimer’s, so I’m guessing that I’ll have less and less time for macros (and documentation) as the years roll by, and we’re also involved in an Alzheimer’s drugs trial.

Also, please be warned that I’m planning to do another sponsored Land’s End to John O’Groats bike ride, but this time for the Alzheimer’s Society. It will have to be a local ride as I don’t like leaving Sue for too long. I can do the required 1,000 miles plus 38,000 feet of climb by cycling 200 times around Taverham, where I live outside Norwich – it’s actually quite hilly here.

I hope you’ll support me – you might say it’s 1,000 miles for 1,000 macros. Thank you, in advance.

Find Paul’s macro resources


About Paul Beverley

Starting in 2005, Paul Beverley’s freelance editing + SfEP + macros got him out of a massive financial hole. Now fully pensioned, he is very fortunate to be able to give the macros back to CIEP and the wider editing world. It’s great fun!


About the CIEP

The Chartered Institute of Editing and Proofreading (CIEP) is a non-profit body promoting excellence in English language editing. We set and demonstrate editorial standards, and we are a community, training hub and support network for editorial professionals – the people who work to make text accurate, clear and fit for purpose.

Find out more about:


Photo credit: Bicycle by Deniz Anttila from Pixabay

Posted by Julia Sandford-Cooke, CIEP information commissioning editor.

The views expressed here do not necessarily reflect those of the CIEP

Two editors introduce their favourite macros

Back in May 2022, Ben Dare wrote a handy beginner’s guide to macros that explains how to start using them. In this follow-up post, Ben introduces some of the macros he finds the most helpful when editing text. Fiction editor Katherine Kirk also talks about some of her favourite macros, and how she’s improved her efficiency by mapping macros to her gaming mouse.

Photo of water droplets on a leaf as a background image to the blog post title and authors: Two editors introduce their favourite macros by Ben Dare and Katherine Kirk

Ben Dare

When I begin with a Word document, I like to analyse it for style and consistency issues. Handily, there are macros to look for all sorts of things, without altering my document at all: spellings of names (ProperNounAlyse); hyphenation of words (HyphenAlyse); consistency of a whole selection of style choices (DocAlyse). Each gives a report in a separate Word document, helping me to understand where possible issues are and highlighting hard-to-spot errors.

But running each of those (and others) is a bit of a faff. So my first favourite macro is MegAlyse (yes, in my head it sounds like Megatron). This macro allows me to list the macros I’d like to analyse the document with and then runs them in an organised way (as long as I’ve installed them!), and it saves the results.

At this point I’ve got an idea of systematic things that I want to change or check individually, and I want to make those changes quickly and highlight things I know I’ll want to check. To do that, the second macro I use is FRedit. This macro has many abilities (there’s a manual!), but at its most basic it runs a list of global find and replace searches that I list in a separate document. It’s easy to experiment with – you can start with a small list and get to know this macro at your own pace – but it is important to know already what you can do with find and replace, including wildcards (and there’s a recent CIEP blog on that here).

Here’s a screenshot of a basic FRedit list, each line showing a find and replace with a vertical bar | separating them:

Screenshot showing the following five pieces of text each separated by a short vertical line: EM dash and EN dash; Navratilova with and without accents; amongst and among (highlighted yellow); Parliamentarians and ^& (highlighted green); ~[A-Za-z0-9]^13 and ^& (highlighted blue).

So with FRedit, in one go I can:

  1. Change all em dashes to spaced en dashes.
  2. Make a name always have the accents it needs.
  3. Change all ‘amongst’ to ‘among’ (the ¬ means it will do upper or lower case); it will also apply yellow highlighting, which is my note to self: ‘I’ve changed this but check it’ – I noticed some ‘amongst’ were in quotations and will need changing back.
  4. Retain ‘Parliamentarians’ (the ^& means replace with what you found, i.e. no change) but highlight in green, which tells me: ‘Not changed but needs checking for client’ – here the client wants lower case, but there were lots beginning sentences, so I’ve just marked them to check.
  5. Find any paragraph that ends in a letter or number, not punctuation (the ~ tells FRedit it’s a wildcard find to search for that range of characters in square brackets). It also adds blue highlight, which is my note to self: ‘Generic issue to check’.

This mixture of changes and highlighting makes things to do or check helpfully visible, but the highlighting does need to be removed. Cue the macro: HighlightMinus. Have the cursor on the appropriate line, or select some text, and the macro removes the highlighting. (Bonus mention: HighlightPlus is great for adding highlighting, to flag something for the client or that you want to come back to.)

Working through a text, some edits take a few mouse clicks/keyboard strokes to do. There are macros to do these tasks more quickly, saving seconds each time, adding up to many minutes over a project. An example is SwapWords: if the document has ‘it badly fell’ and I want ‘it fell badly’, I place the cursor in the first of the words to be swapped, run the macro, and it swaps the two words. It saves the time of manually moving or retyping text, and prevents those little slips of human error. (Bonus mention: SwapCharacters does the same for adjacent characters, handy for swapping quote marks with full stops and commas.)

I’m always reminded there’s stuff I don’t know. GoogleFetch takes the word by the cursor, or a selected phrase, and switches to a browser and searches Google (other providers are available!). It’s quick, easy and less clicking. (Bonus mention: DictionaryFetch does the same but searches an online dictionary.)

The above macros are written by Paul Beverley and are freely available to all. But many useful macros can’t be downloaded – I record them, or alter a pre-existing one, to suit my particular needs. Recording is great for repetitive, simple jobs. Altering doesn’t have to be scary: find a macro that does nearly what you want, tweak it and see what happens (on a spare doc!). For example, a client wanted me to follow the ‘Guardian and Observer style guide’ – so I changed GoogleFetch to open the appropriate Guardian style page for a word instead. It took a bit of learning, but it saved oodles of time in the end. You can even share your attempts and ask for advice on the CIEP macro forum. (Bonus mention: DictionaryFetchByLanguage came from such a process.)

Photo of a water droplet creating ripples on a lake

Katherine Kirk

Like Ben, I use a combination of analysis macros and look-up macros, like MerriamFetch, which searches the term I’m pointing at in the Merriam-Webster online dictionary. But my absolute favourites are the ones that cut down on key combinations that I use all the time. If I can reduce a repetitive set of button pushes to a single click, then it adds up to hours of time saved, and it also reduces repetitive strain on my fingers. Even better, it frees up convenient key combinations for less frequently used macros!

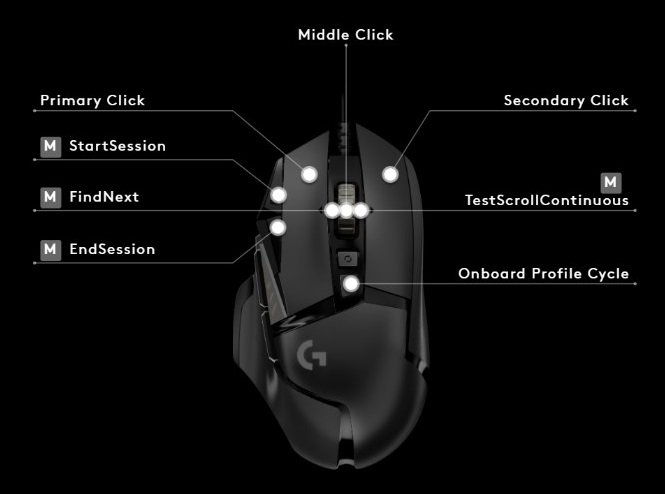
The best thing I did for my efficiency this year was to get a gaming mouse. I use a Logitech G502, and as well as the scroll wheel and left and right-click buttons, it has five extra programmable buttons. I can also push the scroll wheel right or left to trigger more macros. This means I can have seven macros right there without moving my hand to my keyboard. Other editors swear by the Wacom tablet, which gives you much more functionality, but I personally love the satisfying click of the mouse buttons. Also, doing it this way eased the learning curve, which made it much less intimidating. And don’t tell my boss,* but outside of work, I use the mouse for playing games too!

I decided to set the programmable mouse buttons up to improve my workflow. I thought about the routine button pushes I use in every job and settled on the ones that I use most often. These are the macros that have made it onto the mouse:

  • StartSession does a simple search for ‘[]’ in the text, which is a kind of shorthand bookmark I’ve been using since my early days. I find Word’s built-in ‘pick up where you left off’ is a little deficient. I also use this when I need to pause my line-by-line editing to jump around for a global consistency check, so I can find my way back and carry on. I used Word’s macro recording tools to create the Start and End Session macros.
  • VisibleTrackOff4 toggles Track Changes on and off, and it changes the background to yellow when it’s off so I don’t make accidentally untracked changes.
  • GoogleFetch makes fact-checking quicker, since it saves me having to tab over to my browser.
  • MerriamUnabridgedFetch lets me stay on top of hyphenation, capitalisation and spelling much more easily. I mostly work with US texts.
  • Sliding my scroll wheel to the left finds the next instance of something I just searched for in the text. I matched it to the built-in shortcut in Word, Shift+F4, so I didn’t have to create a macro for it.
  • Sliding my scroll wheel to the right scrolls down five lines and moves the cursor back up four, which keeps the text I’m working on comfortably in the middle of the screen. I don’t remember who gave me the macro for that, possibly on the CIEP forums, but they called it TestScroll.
  • Finally, EndSession types my handy little ‘[]’ bookmark and saves the document, ready for the next work sprint.

Here’s how that all looks mapped to the mouse buttons. The labels with an M are macros I’ve assigned.

Diagram of a gaming mouse showing macros mapped to mouse buttons or the scroll wheel Diagram of the side of a gaming mouse showing macros mapped to mouse buttons

Besides the ones mapped to my mouse, the macros I use the most often are the ones that trim down the button pushes needed to make common changes. I work with fiction, so for me, that’s mostly things like changing ‘Yes.She said to ‘Yes, she said. I use Paul Beverley’s CommaInDialogue macro to change that full stop and capital letter into a comma and lowercase letter with a single key combination (CTRL+ALT+,).

As I explore more macros, I want to spend a little more time practising with Paul’s ‘speed editing’ macros. Minimising the time spent on repetitive little tasks means I work faster, and that makes my hourly rate go up without it costing my clients more and without sacrificing accuracy. But really, what I love most about using efficiency-boosting macros like these is that they make me feel like I’m the captain of my own spaceship. The control panel is only as complicated as I want it to be, and I can always add new magic buttons as I discover the need for them.


*I’m a freelancer. The boss is me.

About Ben Dare

Ben Dare is a Professional Member of the CIEP and copyedits/proofreads for projects on sustainable food systems and sustainable living (and almost anything else when asked nicely). Otherwise, he’s probably playing with Lego or Gravitrax, cooking, running, swimming or (regrettably) doing chores.

About Katherine Kirk

Katherine Kirk is a fiction editor who has lived all over the world, including China, South Korea, Ecuador, and Morocco, and she’s not done yet. She works on all types of fiction for adults, especially Science Fiction, Fantasy and Literary Fiction. She is a Professional Member of the CIEP.


About the CIEP

The Chartered Institute of Editing and Proofreading (CIEP) is a non-profit body promoting excellence in English language editing. We set and demonstrate editorial standards, and we are a community, training hub and support network for editorial professionals – the people who work to make text accurate, clear and fit for purpose.

Find out more about:


Photo credits: purple leaf and water droplet both by Pixabay on Pexels.

Posted by Harriet Power, CIEP information commissioning editor.

The views expressed here do not necessarily reflect those of the CIEP

Wise owls: how do you save time when editing?

We asked our parliament of wise owls, all Advanced Professional Members, to share some of the things that have helped them to become faster, more efficient editors over the years. Answers ranged from macros, checklists and templates to a healthier work–life balance and the confidence gained from experience.

Sue Browning

My main tip for speedy editing is to slow down and take a breath before you dive in. I find it helpful to approach large projects in phases, doing basic analysis (headings/structure/style), clean-up and formatting first, followed by my main text editing pass, then a final consistency check and spellcheck. This is all driven by checklists (and sub-checklists). While trundling through the initial, somewhat mechanical, stages may feel like delaying the core task of editing, I find it settles me into each project in a series of familiar steps so that even a new or challenging job feels more under control by the time I start looking at the text.

Another more obvious timesaver is my stylesheet template with combo boxes that contain the most common alternatives for each style point, making setting up my initial sheet very quick. Thanks to Hazel Bird and her helpful blog post for bringing this useful technique to my attention.

Next is keyboard shortcuts, both for frequent operations, like switching between windows and desktops, all the usual Word commands, and for my many macros. I have a lot of keyboard shortcuts, but I learned them slowly, converting the often-used ones to muscle memory, making room in my brain for the next batch.

But probably my biggest practical timesaver is PhraseExpress, a text expander, which I use for emails, author queries/explanations, and any bits of text that I find myself typing repeatedly, including things that I frequently mistype, like my email sign-off. PhraseExpress’s web look-up function also saves me ages when checking references.

Finally, there is the confidence that comes with experience. I know my major clients’ style preferences pretty well (and have PerfectIt stylesheets to help), my grammar and punctuation are pretty sound, and I no longer angst over every comma (just some of them 😉).

Liz Dalby

I’d say that three things in particular have made me a more efficient copyeditor.

  1. Learning to do the language editing late in the process. When I started freelancing, my instinct was to sit down at the text and work through it from beginning to end, reading every word and working on everything that needed doing all at once, as I encountered it. Over the years I have learned – by trial and error, and also by discussing best practice with other editors – to work in a series of passes. Broadly speaking, I start by styling the headings, which gives me an overview of the structure. Then I focus on some of the basic cleaning up I can do, and applying global style decisions based on my own observations of the text, plus the brief and the house style (if there is one). Once the text is in better shape, only then do I start to read it from beginning to end, smoothing out the language as I go, and continuing to add to the style sheet. The language editing isn’t the final pass, because after that there will be a series of checks (depending on the brief and the budget). But it’s nowhere near the beginning! This has made my process massively more efficient – and accurate.
  1. Working within my limitations. Like (probably) all freelancers, my initial instinct was to work ALL the hours in order to establish my business and make a good living. Now I know that I do my best work when I only do about four or five hours of pure editing per day, and take breaks at weekends. I hate working in the evening, so I hardly ever do it. This all keeps me fresh, and able to work quickly. It took me a long time to figure this out. I should have listened harder to advice from more seasoned freelancers! But it is hard to put this into practice until you have built up a steady stream of well-paid work.
  1. I’m passionate about this last one: I approach a text asking myself what can stay the same, rather than what I can change. This can save unnecessary work, and it can also help to build a better relationship with the author, who can see that you’re not making change for change’s sake. However – it’s still important to recognise when fundamental changes are required, and do all of the work that’s needed. Judging this takes experience, and even then it’s possible to get it wrong.

Sue Littleford

Chatting with other editors, I’ve discovered that I’m not the only one who’s slowed down a bit over the years! We think it’s because we know better what we’re doing, where our weak spots are, and we don’t skip things because of inexperience. But, of course, I’ve had to fund that time by finding efficiency savings.

I’m wedded to checklists. They save time by making sure I cover all the steps I need for onboarding or handover and can tick off each requirement as I’ve done it. I also have checklists where I’m required to nudge the English one way or the other (US to UK, for instance), for handling collected volumes and, indeed, for any repeated sequence of tasks.

As anyone who has done the CIEP Efficient Editing course will know, another key is to do things only once, and in the right order – checklists are your friend for this.

A second go-to is PerfectIt – I always, always run it at the end of the job (making it a game between me and it), but I also run its Summary of Possible Errors report at the start, a quick way to give me a good view of the condition of the manuscript, and start thinking about style decisions without making premature changes (discount for CIEP members – you’ll need to be logged in). PerfectIt works best on PCs, but a limited functionality version is available for Macs. I have style sheets for each repeat client.

Finally, I use templates (for my checklists, my style sheets, my word lists and so on, tailored for each repeat client, and a generic version for new clients, which then becomes the tailored template), and a text expander for frequent emails (handover, for example) or author queries text. No reinventing the wheel for me!

Michael FaulknerMichael Faulkner

These are my top tips for speeding up the mechanics of the editing/proofreading process:

  • Buy the biggest monitor, with the highest resolution, you can manage. When I moved from a 27″ to a 32″ monitor, my work rate greatly accelerated.
  • Download two amazing free utilities: AquaSnap and TidyTabs. Using them in combination, you can access and organise all open programs/documents with no clutter. I keep the largest part of screen real estate for the document(s) I’m working on but have everything else off to the side, tabbed and ever ready.
  • Download a (free) text expander to add frequently used words or even large blocks of text with a couple of strokes. I use FastKeys. You can also use it to build macros.
  • Create a Word template for every kind of project you work on (I have half a dozen fiction templates and eight templates for different types of legal publication); populate each template with a Word style for every conceivable character or paragraph element you’re likely to need for that particular type of project; and add a keyboard shortcut for every style you might want to invoke more than a couple of times. Using styles in this way I can tame a 15K-word chapter, which contains only direct formatting and is full of displayed quotes, different heading styles, lots of levels of numbered subheads and the like, in 15 minutes.
  • This one is a question of do as I say, not as I do 😊. Use macros. I’m scared of macros because they have caused unwanted (and unnoticed) wholesale changes in the past that have got me in trouble – but when you master them they’re incredibly powerful.

Hazel Bird

When it comes to speeding up the editing process, one thing I’ve found indispensable is master documents. This is a feature of Microsoft Word that allows you to combine many documents together and work on them as if they were a single document. Master documents have a reputation as being tricky to handle and unpredictable, but in my experience only the first of those characterisations is true. If you ever need to work on multiple related documents at once (such as multiple chapters in a book), it’s worth taking a course on master documents or reading up on how they work. Once you’ve learned their quirks (the ‘tricky to handle’ bit), the seeming unpredictability mostly becomes clear and they open up a paradise of efficiency. It was a revelation to me when I first realised that I could do a PerfectIt run or fix a problematic phrase on five, ten or even a hundred related documents all at once. I’ve found master documents most powerful in my encyclopedia work, where they have allowed me to seamlessly edit and check millions of words at a time. And, of course, this can lead to quality improvements too, as it makes implementing consistency easier.

It’s worth saying that this way of working doesn’t suit everybody and there are other methods (such as Paul Beverley’s FREdit macro) of tackling repeated issues across multiple documents. Also, if you want to use master documents on very large numbers of files, you may find your computer limits what you can achieve. However, if like me you feel most comfortable in your editing when you have everything visible all in one place, then master documents are worth a look.

About the CIEP

The Chartered Institute of Editing and Proofreading (CIEP) is a non-profit body promoting excellence in English language editing. We set and demonstrate editorial standards, and we are a community, training hub and support network for editorial professionals – the people who work to make text accurate, clear and fit for purpose.

Find out more about:


Photo credits: owl by Hoover Tung  on Pexels.

Posted by Harriet Power, CIEP information commissioning editor.

The views expressed here do not necessarily reflect those of the CIEP.

Making friends with macros

In this post, Ben Dare tries to persuade you that macros can be your allies and aren’t too mysterious really. Ben starting using macros very soon after becoming a CIEP member and finding out about them for the first time; he hasn’t looked back.

Macros: More familiar than you may think

A macro is a way of giving Word a job to do, to make it easier for yourself.

We all do this anyway: take a simple yet essential job like starting a new line.

There, done.

I could have used tabs to move the cursor to the next line, or even spaces! But I have little doubt that all readers of this blog know that Enter tells Word to do the job quickly. Time and faff saved.

Now, inserting a new line with Enter is not called a macro – it’s an inbuilt Word function. But in many ways, a macro is just the same, only it’s a job that’s not inbuilt. You get to choose it.

Let’s say a project has inconsistent quote marks, and we need to change the single quote marks to double. Given the possibility of quotes within quotes, and the other uses of the closing single quote mark (apostrophe), using a global change here is asking for trouble. For argument’s sake, we’ll also assume there are other things we’re looking for as we scan through the document, so we aren’t keen to do endless rounds of item-by-item find and replace. It’s going to be done as we read.

So each time we spot one, we:

  • place the cursor on the mark
  • delete it
  • type in the new mark
  • go to the second mark in the pair
  • delete it
  • type in the new mark.

That’s a fair amount of clicking and tapping. Instead we could try a macro: PunctuationToDoubleQuote (to use this or any macro, you need to add it to Word and likely give it a shortcut – and we’ll cover those steps below). Now all we need to do is:

  • make sure the cursor is somewhere before the first quote mark
  • run the macro (by typing the keyboard shortcut you’ve assigned to the macro, like Ctrl+Alt+2)
  • run it again for the second quote mark in the pair.

Every time you run the macro, the next quote mark after your cursor will automatically change from a single to a double quote mark. That’s an example of a macro that makes one change a bit easier, and there’s a macro to do it the other way round too (PunctuationToSingleQuote).

Note: this post was created using Word 2016/Windows 10. Users with other set-ups may have slight differences. Notably, Mac users will want to use ⌘ and Option instead of Ctrl and Alt. Most of the macros here work the same, but for the exceptions there is usually a Mac version available. You can often find them by reading the entry in Paul Beverley’s book, starting with the final paragraph of the general introduction.

A tool for (almost) every occasion

There are other jobs very familiar to you, which take a few clicks/taps or more, that a macro can help do quickly and accurately:

… and so many more. They are all simple jobs, but take a little bit of clicking/tapping. A macro can do it with one keystroke.

Then there are jobs that you simply might not easily be able to do without a macro or other specialist software:

  • ask Word what a particular character is, and what’s the code to reproduce/search for it (WhatChar)
  • analyse a document for inconsistencies in general approaches to numbers, spelling, language, abbreviations and more (DocAlyse)
  • get a table of hyphenations, showing possible inconsistencies (HyphenAlyse)
  • find capitalised words that are spelled slightly differently, to help check whether one of the spellings is wrong (ProperNounAlyse).

These macros don’t edit your document, but provide information about it. This helps you make consistent choices from the beginning.

There are tons of macros available but don’t be put off by the choice. Try one. And when using one becomes natural, another can easily be added, and another – the time saved adds up.

How to get one and use it

A beginner will likely get macros in two main ways:

1. Use one someone else has made

A great place to start with this is CIEP member Paul Beverley’s huge, free repository that he introduces here: http://www.archivepub.co.uk/book.html. The introductory pages and ‘Favourite tools’ might help you know how to find what you’re looking for, and instructions are included. In this blog I’ve used macros from this repository.

But internet searches are also your friend. There are other macros out there to be found, although you may need to pay for some.

Once you’ve found one, it’s time to add it to Word and give it a shortcut. Let’s add PunctuationToDoubleQuote:

  • go to https://www.wordmacrotools.com/macros/P/PunctuationToDoubleQuote.txt
  • select the whole text – a macro always needs its ‘Sub’ top line and its final ‘End Sub’ – and Ctrl+C (or copy it)
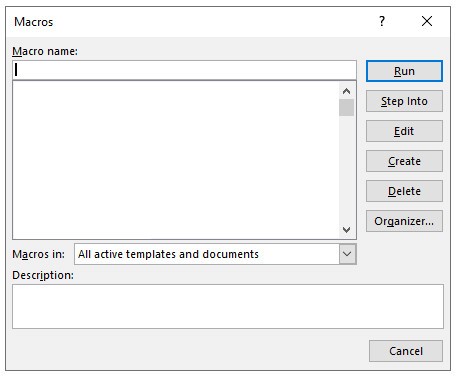
  • in Word, either press Alt+F8 or go to the View tab and click the Macros button to bring up the Macros menu window
  • in ‘Macro name:’ type in ‘temp’ (as because you’re using a ready-made macro, you’ll be changing this)
  • click ‘Create’
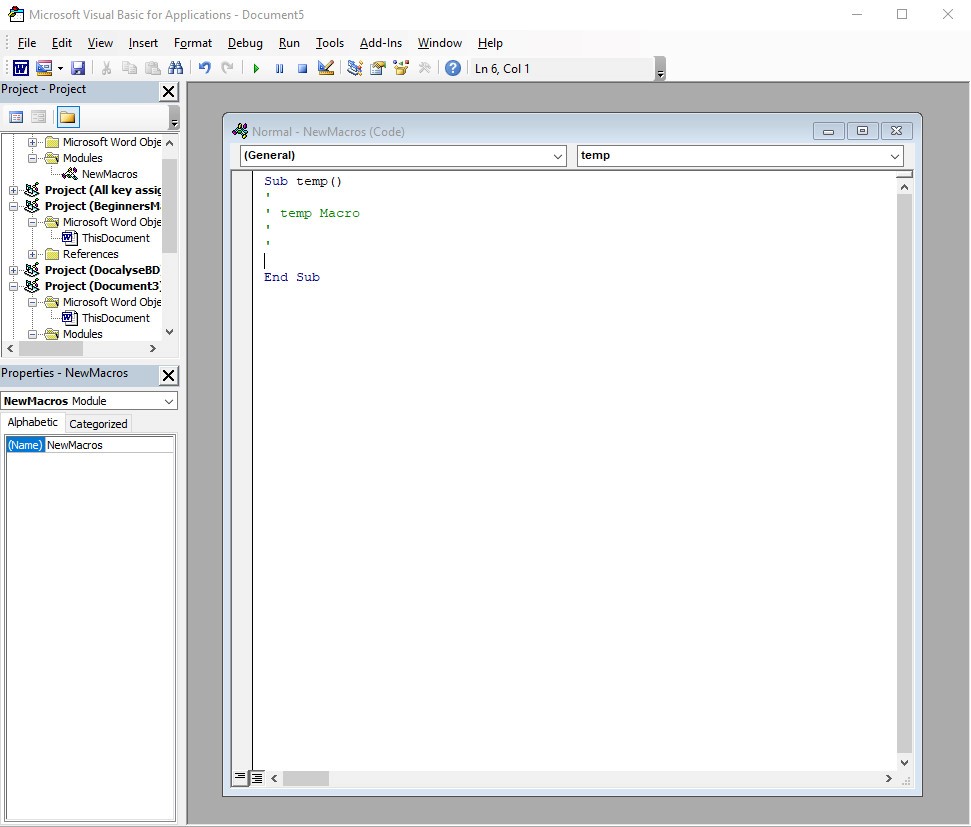
  • you’re now in the macro library
  • select the as-yet empty ‘temp’ macro, from the first ‘Sub’ to ‘End Sub’
  • Ctrl+V to paste in the full copied macro
  • Ctrl+S to save and Alt+Q to close (or use the file menu).

Now that macro is added to your Word, and you don’t need to do that again. Time to give it a shortcut, to make it easy to use (you can always use Alt+F8 and run a macro that way, but it’s not the quickest):

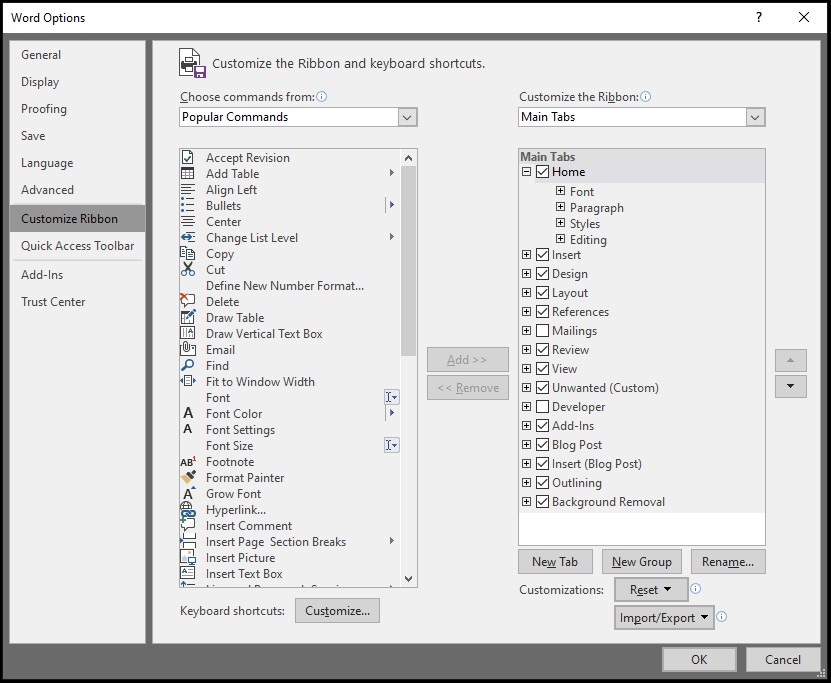
  • right-click on some empty space in the top menu ribbon
  • click ‘Customize the Ribbon’ to get this option window:
    (Tip: You can add any macro to a ribbon tab by choosing ‘Macros’ in the ‘Choose commands from:’ box and then using the ‘Add >>’ button. But I’ll stick to keyboard shortcuts in this post.)
  • to give a macro a keyboard shortcut, click on ‘Customize’ at the bottom, next to ‘Keyboard shortcuts:’
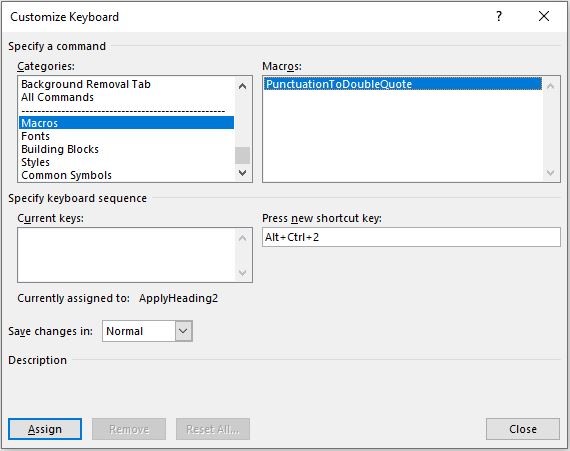
  • in this new window, navigate down the ‘Categories:’ list to ‘Macros’ – it’s near the bottom
  • choose your macro in the list (it’s now got its full name)
  • click in the shortcut box and type in your shortcut; I’ve chosen Ctrl+Alt+2 as ‘2’ is the key with the double quote on it (UK keyboard)
  • check for Word telling you that’s already in use. You can see my shortcut is already assigned, but I don’t use that one, so happy to override. You can choose another if preferred
  • click ‘Assign’
  • click ‘Close’.

That’s the keyboard shortcut set. Time to open up a test document with some single quotes, and test away!

Tip: to save time in future, the next macro you install could be CustomKeys, to quickly bring up the keystroke customising box!

2. Record them yourself

This may feel scarier than downloading a readymade macro, but the beautiful thing about recording them is that they are tailored exactly to the job you need. And apart from setting up the recording, you’re only doing things in Word that you already know how to do! For instance, I once had to delete a number at the start of certain paragraphs, add ‘PPP’ and a tab instead, and apply a paragraph style. Again a few clicks, and monotonous to repeat. To set up a macro to avoid this repetition, I:

  • placed the cursor before the number
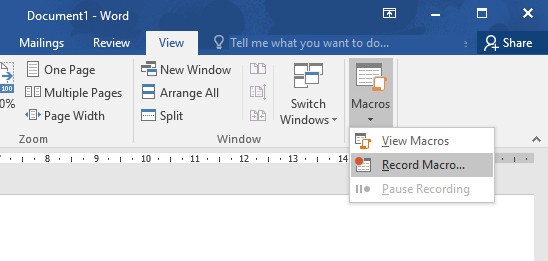
  • clicked the View tab
  • clicked the dropdown menu under Macros
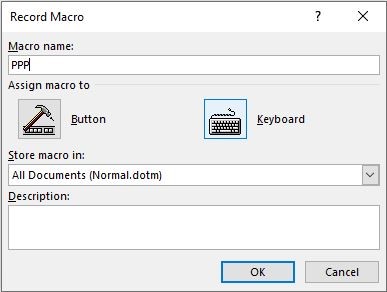
  • clicked ‘Record Macro’
  • gave it a name (‘PPP’)
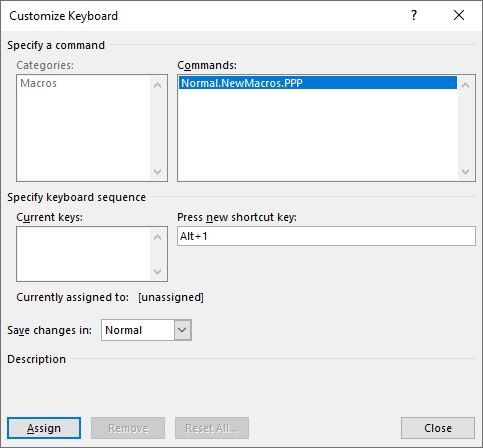
  • clicked the ‘Keyboard’ icon to give it a shortcut (‘Alt+1’ is convenient for me), then ‘Assign’ and ‘Close’.

From this point onwards, Word was recording every single thing that I did in the program. The only thing it can’t record is using the mouse to move the cursor or select text – make sure to place the cursor where you want it before recording, and to use the arrow keys to move around or select text. So to make my macro, I simply carried out the steps I wanted Word to record and repeat when I next ran this macro:

  • pressed Ctrl + Shift + Right Arrow to select the whole number and following space
  • pressed Delete to delete the selection
  • typed ‘PPP’, then pressed Tab
  • clicked on the appropriate paragraph style button.

Now that I’d completed every task I wanted in the macro, I clicked the square ‘Stop recording’ button on Word’s bottom bar (or back in the Macro dropdown menu in the View tab).

Then, for every other instance where I needed to make this change, I simply:

  • placed the cursor before the number
  • pressed Alt+1.

I’d never find that macro online – who else would need it? But for a job that needs repeating many times, it saves many clicks and taps, and time. Give it a go!

Tip: for other hints and tips on recording and using macros, members should check out the CIEP’s fact sheet Getting started with macros.

You’re not alone

If you’re part of the CIEP’s forums, there’s a community ready on a macro-specific forum to help each other to find, use and improve macros. One person has a problem, others help find a solution, everyone benefits. And we’re a friendly bunch to boot.

About Ben Dare

Ben Dare is a Professional Member of the CIEP and copyedits/proofreads for projects on sustainable food systems and sustainable living (and almost anything else when asked nicely). Otherwise, he’s probably playing with Lego or Gravitrax, cooking, running, swimming or (regrettably) doing chores.


About the CIEP

The Chartered Institute of Editing and Proofreading (CIEP) is a non-profit body promoting excellence in English language editing. We set and demonstrate editorial standards, and we are a community, training hub and support network for editorial professionals – the people who work to make text accurate, clear and fit for purpose.

Find out more about:


Photo credits: leaf by MabelAmber, wooden letters by blickpixel, both on Pixabay.

Posted by Harriet Power, CIEP information commissioning editor.

The views expressed here do not necessarily reflect those of the CIEP.

Talking tech: Find and Replace

In this latest Talking tech post, Andy Coulson looks at how Find and Replace can speed up editing and styling references.

In keeping with this month’s theme of references for The Edit, I’m going to take a look at how we can use one of Word’s most powerful in-built tools – wildcard Find and Replace. References have to conform to tight formatting rules, and these lend themselves to using wildcard Find and Replace to tidy them up. This is particularly handy if you have a paper that was written with one form of referencing that needs to be changed to a different one. I’ll give a brief introduction to wildcards, then share some examples that focus on the type of issues in references and finally I’ll take a quick look at using these with Paul Beverley’s FRedit macro and PerfectIt.

Before we get cracking, a word of warning. Many academic authors use reference management software like Mendeley to produce reference lists. This software manages the references outside of Word and links to the Word document. With Mendeley you see references as form fields in the document. If you make changes, the next time the document is opened with a connection to Mendeley the reference list and links are overwritten, losing your edits. If you think this is the case, make sure you clarify how your client wants references edited.

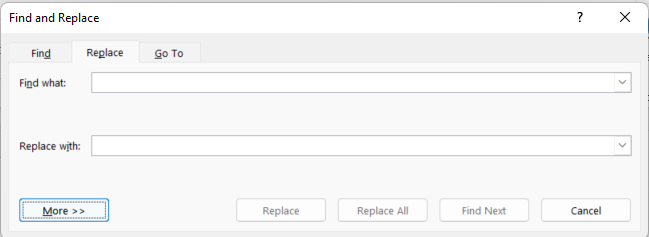
Find and Replace can also be a blunt instrument, so use it with care. While you are refining your search, work on a copy of your text. And don’t use ‘Replace All’ unless you are very clear what you are replacing. It is safer to step through the things being found by using the ‘Replace’ or ‘Find Next’ (if you want to leave something unchanged) buttons.

Wildcards

Word’s Find and Replace feature has a number of hidden extras. If you’ve not already found these, they can be revealed by clicking the ‘More’ button under the ‘Replace with:’ field.

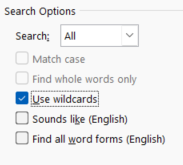
This opens the menu shown below and, as we are going to look at wildcards, we need to check the ‘Use wildcards’ option.

So, what is a wildcard? It is simply a character that can be used to represent anything else. A very simple example is using the character ‘?’ in a wildcard search. If you have ‘Use wildcards’ selected, put ‘r?n’ in the ‘Find what:’ field and ‘ran’ in the ‘Replace with:’ field then press ‘Replace All’, you would replace all instances of ‘ron’, ‘run’, ‘ren’, etc with ‘ran’. The ‘?’ tells Word to find any letter, so it looks for the pattern ‘r’ followed by any letter, followed by ‘n’. This does require a little thought, because what you have now also done, potentially, is turn ‘iron’ into ‘iran’, and a ‘wren’ would become a ‘wran’.

Now that example should alert you to the problems with this, but this is a very simplistic example and to do something more useful we need to dive deeper. Wildcards allow you to specify more complex patterns in the text, and as we will see in the examples below we can do some quite complex searches, often with a little trickery.

As this is a (relatively) short article I’m not going to be able to go into all of the possibilities. The best way to learn how to use these is to experiment. If you want some help, there are a number of resources available:

Examples

Let’s have a look at a couple of reference-related examples in detail so we can see how these work. For the referencing gurus out there, I am going to omit some required information from the references for clarity and play a bit fast and loose with referencing styles.

Example 1: Initials in names

Different referencing systems use different conventions for citing authors’ names in the reference list. So, you may have Hartley, J.R. (APA style), Hartley JR (Vancouver style) or even J.R. Hartley. Usually a reference list will be (largely) consistent, so it has a pattern we can find and a pattern we can replace it with. We will start with these three references:

A.N. Author. (1986). Writing for beginners (2nd ed.). Jones Books

S. Editor. (2021). Editing for fun and profit (1st ed.). MyPub Ltd

I.S.B. Nash. (2007). Cataloguing books (3rd ed.). Big Books Inc.

With Find and Replace we need to break problems down into manageable chunks, and sometimes multiple searches, that can be implemented by Find and Replace. Let’s assume we need to change author-name style in the list to Vancouver. The first issue we can tackle is the structure of the author names – setting them after the surname.

To do this we use the ‘Find what:’ string¹

^013([A-Z.]@) ([A-z]@).

What this does is:

  1. Looks for a line break: ^013 (‘^’ tells Word the number following is a character code. Note that these are for Windows and may be different on a Mac. You can find a list of these in the Wildcard Cookbook and macro book mentioned above).
  2. Looks for one or more initials: ([A-Z.]@) – the round brackets are grouping together and are important when we come to replace things; the [A-Z.] looks for capital letters or a full stop and the @ tells Word to look for one or more occurrences of these. Note that there is a space after this term, like in the text.
  3. Now looks for a capitalised word: ([A-z]@) – a combination of upper- and lower-case letters.

Now we replace the surname first and the initials after using this ‘Replace with:’ string:

^p\2 \1

This replaces the text as follows:

  1. We put the line break back in: ^p – note that we are using a different code here. ‘Why?’ you may ask. Because Word …
  2. Next we put the surname in: \2 – the \2 tells Word to use the second item in round brackets, what we found with item 3 above.
  3. Finally, we add the initials back in after a space – \1 – using the first bracketed item we found in item 2 above.

This leaves us with:

Author A.N. (1986). Writing for beginners (2nd ed.). Jones Books

Editor S. (2021). Editing for fun and profit (1st ed.). MyPub Ltd

Nash I.S.B. (2007). Cataloguing books (3rd ed.). Big Books Inc.

Now we need to remove the extra full points. We have to do that in two steps, by taking out all the relevant full points and then adding back the one after the final name.

So, removing the full points we use this ‘Find what:’ string, which simply finds one capital letter followed by one full point.

([A-Z]).

We then put the capital letter back in using this ‘Replace with:’ string:

\1

This gives us:

Author AN (1986). Writing for beginners (2nd ed.). Jones Books

Editor S (2021). Editing for fun and profit (1st ed.). MyPub Ltd

Nash ISB (2007). Cataloguing books (3rd ed.). Big Books Inc.

Now we add the final full point back in before the bracket with the year. That bracket gives us a pattern we can identify to put the full point in the right place. So, we use the ‘Find what:’ string:

([A-Z]) \(

As before, the round brackets contain a string to find one capital letter; this is followed by a space and finally by \(. ‘What is that?’ you may ask. Well, we use brackets to create a sequence in the search string that we can return to later, so in wildcard searches round brackets (and a number of other symbols) work as commands. In order to refer to those symbols we need to escape it, which means adding a backslash in front, so \( finds an opening round bracket. We can then use the following ‘Replace with:’ string to add the full point.

\1. ^40

As before \1. adds the initial back with the full point and ^40 puts an open bracket back. Again, note the different way that replace refers to the character, but that’s just the way it works I’m afraid. This then gives us:

Author AN. (1986). Writing for beginners (2nd ed.). Jones Books

Editor S. (2021). Editing for fun and profit (1st ed.). MyPub Ltd

Nash ISB. (2007). Cataloguing books (3rd ed.). Big Books Inc.

Example 2: Adding styling

I realise this is not proper Vancouver referencing, but I want to show you how we can add styling using wildcards. In this example we will apply italics to the book titles. As before, we need a pattern to recognise which part is the book title. In this case we have the end of the year ‘). ’ and the start of the edition ‘ (’. However, in order to find the title we have to find more text, the two brackets before and after, which we don’t want in italics. This means we need to be a bit cunning!

To do this we use this ‘Find what:’ string:

(\). )([A-z .]@)(\([0-9])

  1. (\). ) finds a closing bracket \), followed by a period and a space and we want to keep those, so we group them.
  2. ([A-z .]@) looks for a mix of upper- and lower-case letters, spaces and full stops – our surname and initials.
  3. (\([0-9]) looks for an open bracket \( plus a number – the characters at the start of the edition.

If we then replace this with:

\1%%\2%%\3

we put %% before and after the characters of the title that we want to italicise:

Author AN. (1986). %%Writing for beginners %%(2nd ed.). Jones Books

Editor S. (2021). %%Editing for fun and profit %%(1st ed.). MyPub Ltd

Nash ISB. (2007). %%Cataloguing books %%(3rd ed.). Big Books Inc.

We now have the title clearly marked, so can then style that. We search for the modified title with %% before and after.

%%([A-z .]@)%%

We then replace that with just the title text, which we have put in round brackets, so \1 goes in the ‘Replace what:’ field. Before we replace this, we need to tell Word to italicise this text. If you tap on the ‘More’ button in the bottom left you will see a ‘Format’ button. Pressing on this pops up the menu shown below. If you select ‘Font’ the font dialogue box pops up and you can select ‘Italic’. You will also see ‘Font: Italic’ appears under the ‘Replace with:’ field.

Running that Find and Replace gives us our final list:

Author AN. (1986). Writing for beginners (2nd ed.). Jones Books

Editor S. (2021). Editing for fun and profit (1st ed.). MyPub Ltd

Nash ISB. (2007). Cataloguing books (3rd ed.). Big Books Inc.

Integrating with Macros and PerfectIt

Wildcard Find and Replace searches like this are real timesavers, but there’s no obvious way of saving these and using them again and again. There is a short history for both the ‘Find what:’ and ‘Replace with:’ fields if you click the down arrow at the right of each, but I don’t find this particularly helpful.

Both Paul Beverley’s FRedit macro and PerfectIt support using wildcards, so offer a way to reuse multiple Find and Replace searches. As the point of using things like macros and wildcards is to save you time sometimes the investment of time to set up those searches in a macro or PerfectIt may not add up compared to just running the searches. For example, I do some work on papers for academic journals that are about 6,000 words long. I get material for multiple different journals, so it is quicker for me to just use a few Find and Replace searches rather than setting up, say, FRedit. However, a book or multiple papers for the same journal would change that, and setting up FRedit or PerfectIt would then be worthwhile. Having said that, writing this has convinced me to create a file of Find and Replace searches I can refer back to. I will probably format this as a FRedit list so I can use these with that macro.

PerfectIt allows you to perform wildcard searches in the ‘Wildcard’ tab. This lets you use all the features of wildcards in Word Find and Replace and adds a couple of neat features. The first of these is that you can add an instruction or prompt that explains what the search is doing, because, as we saw above, patterns can crop up in unexpected places. The second of these is that you can add exceptions. PerfectIt’s manual page uses the example of apostrophes being added to numbers followed by ‘s’, so ‘we have 3s, 4s and 5s chosen’ is correct. However, if we talk about ‘Page 4’s content’ we need the apostrophe. We can make numbers after the word ‘Page’ an exception.

FRedit is a scripted version of Find and Replace, so runs multiple Find and Replace searches from a list. It uses all the forms in Word Find and Replace, but has a few little tweaks you need to use in the file of searches we set up. FRedit doesn’t present us with the dialogue boxes that Word Find and Replace does. So in the file we use ‘|’ to separate the ‘Find what:’ and ‘Replace with:’ terms on a line and add ‘~’ at the start of the line if we are using wildcards. We can also add formatting easily. I sometimes use FRedit to quickly highlight things so I can then take my time on a read-through to check the context. For example, if you have an app called Balance it needs capitalising, but if you also talk about keeping your balance it doesn’t, so you have a mix, but the context will determine which you use.

Hopefully this has given you some ideas and encouraged you to go and experiment. I can honestly say learning how to use wildcards and Find and Replace efficiently has helped speed up my editing enormously. Combining these with FRedit or PerfectIt speeds things up even more where you have longer pieces or house styles you use regularly.


1 Paul Beverley has flagged that while ‘[A-z]@’ will find any letter it does not pick up on accented letters. A better solution is ‘[A-Za-z]@’.

About Andy Coulson

Andy Coulson is a reformed engineer and primary teacher, and a Professional Member of CIEP. He is a copyeditor and proofreader specialising In STEM subjects and odd formats like LaTeX.


About the CIEP

The Chartered Institute of Editing and Proofreading (CIEP) is a non-profit body promoting excellence in English language editing. We set and demonstrate editorial standards, and we are a community, training hub and support network for editorial professionals – the people who work to make text accurate, clear and fit for purpose.

Find out more about:


Photo credits: magnifying glass by towfiqu barbhuiya on Canva, joker by Roy_Inove on Pixabay.

Posted by Harriet Power, CIEP information commissioning editor.

The views expressed here do not necessarily reflect those of the CIEP.
Forum matters: References

This feature comes from the band of CIEP members who volunteer as forum moderators. You will only be able to access links to the posts if you’re a forum user and logged in. Find out how to register.

Mention to an editor that a project contains references and they are likely to envision a long list of citations that may or may not be appropriate or even needed, and that may be incomplete and multi-styled. A search on ‘reference’ brings up over 2,600 posts (about 400 specifically on citations/referencing) across all forums that cover (among other subjects) styles, references to, ways to reference people, using Word, PDF markup, definite articles, the Bible, information sources, languages, macros and the effect of being in different generations.

Essentially, Luke Finley summarised what browsing the forums can do for you in A fun moment courtesy of ProperNounAlyse: ‘I do like those moments when you can make copy-editing look like some kind of dark art.’

Citations

First to the pure business of citations, which is a core activity for all academic editors and for many works of non-fiction. If you are a regular checker of citations and a macro user then you may already have taken advantage of Paul Beverley’s CitationAlyse; if not, then have a look at Citation checking made even easier and its accompanying YouTube video.

If you are in need of reference management software then that is also dealt with on the forums. Although mention of a discount may be outdated by the time you read Using EndNote to style references, the information about its features, new approaches and the subsequent discussion is well worth a read. There are also threads about Word’s Reference tab (see Word Referencing et al.) and all sorts of macros – some of which become reference lists in their own right (Efficient PDF Markup).

Helpful pointers

Software or hardware updates can occasion glitches and if you don’t have your own IT guru or can’t find a solution via googling, then a quick share on the forums can often help you to keep on checking those references (see Copy & paste weirdness – new PC installation). For people to give you the best answers to many of these queries it can help to upload an example file or image, as demonstrated by the thread Macro for endnotes.

If you are still finding your way as an editor, the forums are a great place to sound out approaches to referencing, whether because of inconsistencies in styling, as in Serial commas in text but not citations, which leads to a steer on how to query; or whether it is helping students settle on the best approach, as in Academic copyediting: combinations of citation and style guides. Checking formatting is also dealt with, from problems with numbering in Reference indent query to addressing the titled in Full name or initials after ‘Sir’ in references. The latter thread leads from knights to the invasion of Grenada to indexing seven Sir Johns! Forum members seem well-versed in matters of etiquette, should you need advice, not just on lords but also on References to Professor/Doctor.

If you are seeking guidance specific to a publisher’s way of working then it is wise to put their name in the topic title, as in Palgrave Macmillan style guide. With the number of members who have signed up to the CIEP forums and their range of experience, you are bound to get a useful (and sensible) response that will help you do the best job for that (new) client.

If you are working with a non-fiction self-publisher then you are probably going to have to make many more decisions about how to style the references and be extra careful about checking them – which was the sort of advice sought in Best citation system? – while you will benefit from the sense expressed in Inclusion of the definite article in journal titles.

Specialisms

Thanks to the reach of CIEP recruitment, many language references can be checked with those who really know their etymology. German referencing issues leads to Ancient Egypt, while Dir. – French abbreviation opens up the world of job titles.

Referencing also comes up in fiction, as in references to Age appropriateness? and the place of violence in a children’s fantasy novel; and references to the 1980s in Exposition/First person POV and how different generations might be frustrated to allusions they won’t understand.

The broad church that is editing (and the CIEP) means that whatever your reference requirement you are likely to find an answer, whether it is on Where to check plant (fruit) species, Citing foreign language films in Chicago or ways of Quoting Whole Bible Chapters. This last led to a personal offer of help, which is not uncommon on the forums, as confirmed by the fulsome thanks in Shouting out about Janet!

About the CIEP

The Chartered Institute of Editing and Proofreading (CIEP) is a non-profit body promoting excellence in English language editing. We set and demonstrate editorial standards, and we are a community, training hub and support network for editorial professionals – the people who work to make text accurate, clear and fit for purpose.

Find out more about:


Photo credits: beach by Anthony Cantin, bookshelf by Yury Nam, both on Unsplash.

Posted by Harriet Power, CIEP information commissioning editor.

The views expressed here do not necessarily reflect those of the CIEP.
Talking tech: Automating style sheets

In this Talking tech column, Andy Coulson considers the options available for automating style sheets.

The theme of February’s member newsletter, The Edit, is editorial judgement and, as I’m sure you’ll have noticed, this is something computers are not good at! While the latest artificial intelligence systems are great at applying rules consistently and often ruthlessly, they are not good at making those subtle judgements that convey nuanced meaning or reflect an author’s voice. So how can technology help us?

Our main tool for recording our professional editorial judgement is the style sheet, whether that is something created specifically for a job, or by making additions to a style sheet from a client. We have a number of tools that we can use to support our creation of style sheets.

Exploiting your computer’s strengths

So, if our computer is not good at judgement, what is it good for? Computers are very good at following rules and recognising consistency. We can make good use of that to spot patterns in the materials we are working on and inform decisions that we can then record in a style sheet. We can also use these to help us see where exceptions are, as these can be important too (for example judgment in British English refers to a legal judgment; judgement is what you are applying in choosing the right spelling of it!).

One thing I’m not going to look at is the Editor tool in Word itself. In theory this should be able to do a lot of the things I’m going to talk about, but I’m afraid I just can’t get on with it. I find that configuring it is too fiddly when you are working on material where the style can change from job to job. I’m going to look at PerfectIt and Paul Beverley’s macros, as both of these will ultimately allow you to do things quicker and, to my mind, more accurately as editors and proofreaders.

PerfectIt

PerfectIt is a proofreading and consistency add-in for Word. Many of us use it to speed up our workflow and it can be used to help with identifying style sheet issues with the text you are editing. When you run PerfectIt, the content of the document is compared against a number of tests. You can use the results to identify what needs to be included in the style sheet.

Let’s have a look at an example. I’ve got a journal article that the client needs to be in US English and they prefer to use the Merriam-Webster dictionary for spelling. I’ve selected the basic ‘US Spelling’ style in PerfectIt, but you may be able to find (or create) a more comprehensive style sheet that is more applicable. If you regularly use PerfectIt it would be worth keeping an eye on the ‘PerfectIt Users’ group on Facebook, as they are developing a collaborative style sheet project.

Here one of the tests is checking the consistency of hyphenation. As we can see, the author has used ‘photogenerated’ five times and ‘photo-generated’ once. This flags that we need to check and make a judgement. This isn’t in Merriam-Webster, but ‘photoactivated’ and ‘photometered’ are, so I feel comfortable going with the single word and can justify the choice, and that goes on the style sheet.

Hopefully you can see how you would go through and build your style sheet in this way, using the computer’s strength around consistency checking.

Macros

I’ve written before about Paul Beverley’s macros (archivepub.co.uk/index.html) – they are a brilliant resource and Paul contributes so much to the community with these. I’m not going to give detailed instructions about using the macros highlighted as Paul’s book and videos do that really well. I’ll concentrate on an overview of the tools you can use to create a style sheet at the start of a job. Paul also lists his editing process in the book or in his Macro-aided book editing video, and this includes using the macros to identify potential style sheet items.

Overall, I think I prefer this approach to using PerfectIt, although I do use both tools for different jobs. I work on a lot of school textbooks and I find that the macros are able to do a lot more tidying up of formatting than PerfectIt, so they suit my workflow better.

Two key macros to start with are DocAlyse and HyphenAlyse. DocAlyse is a ‘Swiss army knife’ tool that looks at a range of features of the document, such as how numbers appear, approximate US and UK (and -is/-iz) spelling counts, Oxford (serial) comma counts and so on. All of these give you a broad view of your author’s preferences. Paul also has the UKUScount and IZIScount macros that provide more accurate counts if the language and spelling choices are unclear, and SerialCommaAlyse that counts serial comma use more accurately. You can then apply your judgement to the results and record those in the style sheet.

Next up is HyphenAlyse, which looks at hyphen and en dash usage in the document and creates a list of hyphenated phrases along with their open equivalents as well as commonly hyphenated prefixes (for example, net-zero and net zero or coordinate and co-ordinate). The output gives you counts of each usage, helping you to narrow down your choice and again build the style sheet.

SpellAlyse can then be used to make a list of potential spelling issues – this will help identify spellings specific to the topic or flag words that need checking. SpellAlyse has a number of other tricks up its sleeve and Paul’s book explains these. In addition, ProperNounAlyse and CapitAlyse try to identify proper nouns and capitalised words, again helping to inform the choices you make, which can be added to the style sheet.

Unlike PerfectIt you don’t see these in context, but Paul has a number of highlighting macros that can help with this. Because all of these macros produce outputs in Word files it is quick to add things to a style sheet. It is also fairly easy to create a file to use with Paul’s FRedit macro, which performs a scripted find and replace on your file. As well as building a list of corrections to apply to the files you could also use FRedit to highlight a range of issues in the document so you can make decisions about them.

Macros do take a little getting into, but the time savings that they can provide make this time well spent. Over a few jobs you will be able to identify a set of macros that help you create an efficient process, and you will be able to allocate keystrokes to them and create backups.

Hopefully I’ve convinced you to invest a bit of time in learning these tools, as in the longer term they can be real time savers. As ever, back up your customised PerfectIt style sheets (.pft files) and FRedit script files as you can often use and adapt them. There are also lovely people out there sharing other resources like this that they have created. Among the places you can find these are the CIEP forums, where there’s a dedicated ‘Macros’ forum; and the ‘PerfectItUsers’ group on Facebook.

About Andy Coulson

Andy Coulson is a reformed engineer and primary teacher, and a Professional Member of CIEP. He is a copyeditor and proofreader specialising In STEM subjects and odd formats like LaTeX.


About the CIEP

The Chartered Institute of Editing and Proofreading (CIEP) is a non-profit body promoting excellence in English language editing. We set and demonstrate editorial standards, and we are a community, training hub and support network for editorial professionals – the people who work to make text accurate, clear and fit for purpose.

Find out more about:


Photo credit: laptop by Skitterphoto on Pexels.

Posted by Harriet Power, CIEP information commissioning editor.

The views expressed here do not necessarily reflect those of the CIEP.

Why macros deserve pride of place in your editing toolbox

This year’s CIEP conference was held online, from 2 to 4 November. Attendees from all over the world logged on to learn and socialise with their fellow editors and proofreaders, and a number of delegates kindly volunteered to write up the sessions for us. Christina Petrides reviewed Macro-driven book editing, presented by Paul Beverley.

Paul Beverley at the 2019 SfEP conference.

If you are a macro newbie, as I am, you may have thought that this session wasn’t for you. But any time the Macro King – as introduced by Beth Hamer – holds a session, I find it’s worth listening in.

With the myriad of editing tools that are out there, we begin to dabble in macros as we find our editing feet. Most of us know the power of the macros that Paul has written – DocAlyse and ProperNounAlyse, to name just two. Now if – again, like me – you found those to be a revelation for your editing work, you’re in for a surprise.

Paul’s session was less ‘what to do’ to improve your editing efficiency but more ‘this is what you could be doing in the next two to four years’.

Every stage of editing could be macro-assisted. Macros don’t replace skill and intelligence, but can take over the boring bits, pay better attention than you, and allow you to enjoy editing the text.

The hour-long session was fast-paced and full of information. Paul began by putting macros and their power into perspective. There are currently 794 macros available in his book and 25 hours of tutorials on his YouTube channel. Of those, 16 are dedicated to FRedit, which even has its own manual, demonstrating the power of FRedit alone. From its beginnings in the 1980s, FRedit has been evolving in Paul’s expert hands into what it is today.

So when the Macro King says he wants to inspire us into using more macros to make our lives easier (not put us off), it’s worth hearing him out.

New macro users are told that Paul focuses on three types of macros. They cover analysis, making global changes before you start and making changes as you read – all expertly covered by Karen Cox’s earlier session.

As user experience and understanding grow, so does the ability to use macros effectively. Paul broke them down into an additional ten ways in which they can assist us editors in our work:

  1. instant information gathering (counting things, searching the internet, checking references)
  2. speed navigation (searching, comparing, moving around the text)
  3. list handling
  4. file handling (combining/splitting files, converting a whole folder to PDF, accepting Track Changes)
  5. comment handling (creating comment and query lists)
  6. highlighting and colour handling (adding or removing)
  7. figure and table handling (adjusting/stripping out spacing)
  8. formatting (making and using list styles, changing styles, finding ‘funny’ formatting, copy/paste formatting, formatting equations/lists)
  9. note handling (converting to text, re-embedding, correcting formatting)
  10. reference handling (checking/correcting citations, adjusting format, checking alphabetisation).

Paul then quickly demonstrated many of these macros in action on real files.

If this has got you quaking in your editing boots, take a step back. Pick one or two macros to start with and get comfortable using those. Start with the analysis macros, then add to your macro toolkit as your skill and experience grow.

What seems frightening and insurmountable can soon be second nature, and a whole new world of editing can open up. Take it slowly and you may soon be creating your own macros!

Christina Petrides is an Intermediate Member who recently discovered the power of macros. She turned to editing and writing after a career in environmental consultancy, which she still dabbles in. She focuses on business and academic work, although will work on almost anything non-fiction. Travel is her other great love, and she’s often working on the road and blogging about it.


If you’re taking your first tentative steps into using macros, do check out the summary of Karen Cox’s Macros for beginners session.


CIEP members can download a Getting started with macros fact sheet from within their members’ area.


Posted by Abi Saffrey, CIEP blog coordinator.

The views expressed here do not necessarily reflect those of the CIEP.