Tag Archives: technical

Talking tech: Clipboards

In this month’s Talking tech column, Andy Coulson looks at getting the most out of your clipboards. There’s more than one, for a start, and they include several tools and functions you might not have known about.

We all use the clipboard frequently: that useful little bit of temporary storage that allows you to copy a bit of text and repeatedly paste it into a document can often simplify repetitive jobs. However, a recent job that meant adding a lot of tags to the text to tell the typesetter how to style the paragraph, like <A> to flag that the current line is an A head, really highlighted the limitations of this and got me looking at whether there might be better ways to do things.

Office clipboard
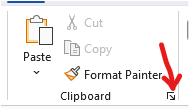
Arrow in clipboard section of WordIn Windows there are in fact two clipboards if you use Office, as that has its own clipboard. The Office clipboard lets you review the last 24 items stored to it. You can access this by clicking on the little arrow in a box in the Clipboard section of the Home ribbon in Word (indicated by the red arrow here).

You then have a sidebar that gives you access to up to 24 items on the clipboard. You can click on these and paste them into your document. When you get to 24 items the next item you copy goes to the top of the list and the bottom item is removed from the list. This means if you are repeatedly using items then your regularly used items can drop off the bottom of the list. Closing all Office programs will also empty the Office clipboard, so if you are doing something like tagging, it is worth keeping a Word or Excel Window open to preserve your clipboard list.

If you are using the clipboard to rearrange text, there are a couple of ways of working around this problem by bypassing the clipboard and keeping its content intact. The first of these uses the mouse. Select the text to move with the mouse by left-clicking and dragging, then move the mouse to where you want to move the text, hold the Ctrl key and right-click once where you want the text to go. Your text will pop up in the new destination. You can also drag the selected text by keeping the left button pressed while moving to the new location.

The other tool is the spike (named after the old-fashioned spike often found on editors’ desks). This allows you to collect several bits of text from the document and put them elsewhere in the document, or in a new document. Imagine you need to rearrange some paragraphs, clipping lines from two or three places to create a new paragraph. Spike will paste all the items you collect as a single block of text, so you need to think about the order you collect the text in. The first item you clip will be the first item in the pasted text and so on. So, you select the first item and press Ctrl+F3. This cuts the item to the spike, but if you want to copy, just press Ctrl+Z after: the item is still on the spike, but remains in its original place too. When you have collected all the pieces you want, place the cursor where they are going (or open a new document) and press Ctrl+Shift+F3 to paste all the items.

Someone typing on a laptop

Windows clipboard

Windows also has a clipboard that operates in a semi-detached fashion from the Office clipboard. Historically this also had a clipboard history tool which disappeared at some point, but is now back in Windows 11. It can be enabled by going to Settings, System, Clipboard and turning ‘Clipboard history’ on at the top of the list. Ctrl+V will then bring up the Windows clipboard history.

You can paste directly from here into Word, and this material is saved even when your Office programs are closed. You will notice, if you have Office clipboard open, that the items copied from the Windows clipboard appear in the Office clipboard. This can be a bit confusing, and I’m not entirely sure about the rationale of having two clipboards – I’m assuming it is for compatibility with the Mac version of Word.

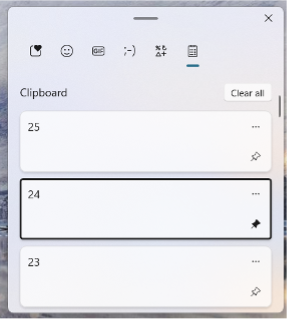
Windows 11 clipboard history

The Windows 11 clipboard history (shown here) has a couple of potentially useful tools. Firstly, you can see that there are various icons across the top. Perhaps the most relevant is the symbols one, second from the right. This is like the ‘Insert Symbol’ command, giving access to all the available symbols for the current font. The other is that you can pin items to the clipboard, by clicking on the little pin to the right of each item (24 in the list in the image is pinned). These are saved until you clear them and are saved in addition to the 24 items in the Windows clipboard, although if you paste into Word they will take up one of the 24 slots in the Office clipboard. You can use this as a way of saving regularly used items (like my tags) and bringing them back into the Office clipboard when you need them. You probably won’t be surprised to learn that there is a macro that does something similar, and I’ll touch on that below.

Useful macros

One particular macro, CopytoClipboard, was discussed on the forums here – contributed by James Baron with a bit of refinement from Paul Beverley. What this does is let you create a Word file and, with the Office clipboard sidebar open, it will populate the clipboard from the file. This is what I ended up using to tag my file. If things dropped off the bottom of the list, I could clear the clipboard and reload from the file. It meant I had a list of tags I could click on to insert, and could import with the correct formatting.

It is also worth looking at Paul’s FRedit macro (or Windows Find and Replace if there are only one or two patterns) to see if there is a pattern you can find to do the pasting or formatting for you. In my tagging example, if there had been numbered headings, you could potentially have searched for heading styles or the pattern of numbering and added the tags automatically. Even if that was only 90% correct in a long manuscript, that could still be a significant time-saving.

Clipboard extenders

Finally, there are various clipboard extender programs that add to the functionality of the clipboard. I have used ClipX in the past, but this hasn’t been updated for several years, so I wouldn’t recommend it. This allowed the clipboard to have more capacity as well as providing ‘stickies’, which were like the pinned items in the Windows 11 clipboard, but were presented in a really useful pop-up menu.

There are many others available, but going by most of the reviews, I have so far avoided trying any, as I think they may actually cause more issues than they solve. If anyone has tried any and rates them, please let me know in the comments, and we can perhaps have a round-up in a future column.

I realise I have not touched on the Mac clipboard, for which I apologise as a non-Mac user. However, the bit of reading around I have done suggests the situation on the Mac is similar. Again, if anyone would like to share their Mac experiences in the comments, we can perhaps revisit this.

To sum up, the clipboard is really several clipboards that operate in similar and overlapping ways. On Windows 11 with Office you have a number of tools for cutting, copying and pasting text that work pretty well. Things start to get a bit trickier if you have to copy and paste a larger number of items frequently – as in my tags example – where copying from another document each time is slow and creates a lot of wear and tear on your mouse hand. It is worth spending some time exploring whether there are better ways of doing this to improve your efficiency and look after your wrists.

About Andy Coulson

Andy CoulsonAndy Coulson is a reformed engineer and primary teacher, and a Professional Member of the CIEP. He is a copyeditor and proofreader specialising in STEM subjects and odd formats like LaTeX.


About the CIEP

The Chartered Institute of Editing and Proofreading (CIEP) is a non-profit body promoting excellence in English language editing. We set and demonstrate editorial standards, and we are a community, training hub and support network for editorial professionals – the people who work to make text accurate, clear and fit for purpose.

Find out more about:


Photo credits: header image by Pixabay, someone typing on a laptop by Breakingpic, both on Pexels.

Posted by Eleanor Smith, blog assistant.

The views expressed here do not necessarily reflect those of the CIEP.

Talking tech: Getting the best out of remote meeting tools

In this Talking tech column, Andy Coulson discusses what you can do to improve the quality of your video calls.

During the pandemic meeting up has meant using remote meeting tools like Zoom, Skype, Teams and FaceTime. We’ve all become used to using them to some extent, whether we like or loathe them. Here I’m going to look at some of the things we can all do to improve the quality of what others see and hear on a video call.

There are three things we have control over in a video call – our WiFi signal, what our camera sees and what our microphone hears. I’ll look in detail at each of these below; they are all simple, low (or no) cost and often don’t involve the technology at all.

WiFi

Using remote meeting tools for video calls or meetings relies on a good internet connection because video needs lots of bandwidth, and it needs be reliable. To start with I am assuming that the internet connection to your house or workplace is reliable. If it is not, talk to your supplier as they should be able to test it and possibly diagnose problems remotely. I’ve just had my supplier resolve a problem caused by a faulty extension socket in the house and they’ve been brilliant. I’ve also learned a bit more about my connection, which means I can hopefully get issues resolved more quickly in future when I speak to them.

If the connection is all OK then you need to ensure you have the best possible connection to the internet. Many of you will connect via a router (the box your supplier provides). One of the simplest ways of ensuring you have a good signal is to use a cabled connection. Most routers have some network connections on the rear and they often come with a cable. However, this does mean you need to be close to the router unless you want to buy long cables.

Next, if you are connecting via WiFi or using a mobile phone you need to make sure you have as strong a signal as possible. To do this you will need to experiment and move to different parts of the house. Different materials block these signals to different degrees, so where your phone or laptop is makes a huge difference. I live in a bit of a mobile phone dead zone, so there are only a few spots in the house where I get a good mobile signal, and two places half a metre apart can have enormously different signals. Your phone indicates the strength of WiFi and phone signals and your laptop will show the WiFi strength, so use these to find a good place to work with strong signals.

Person at desktop computer on a video call

Getting the best from the camera

Cameras on mobile phones and laptops are generally pretty good. The software behind them gets ever more sophisticated, but you can make the job easier by thinking about what will be in the camera’s view and how it will be lit.

One of the easiest things to do is to have as clean a background as you can. I often hang a sheet behind me or use a projector screen, as this gives a plain background. A plain background helps the camera to focus on you, because you are easier to pick out. This in turn helps with lighting, because if the camera can pick out your face easily it will try and make that look as good as it can by adjusting the brightness.

If you use a camera app (eg Camera in Windows) you can play around with backgrounds and see what works best. For the space I use I think a pale background works best, but you may find that something dark works better.

The other thing you can control is lighting, and this can make a huge difference. If you are near a window, the time of day and time of year also make a difference. For example, my office is in the attic and I sit with a Velux window above and behind my head. In the summer, when the sun is on that side of the house, I have to black that out; it is so bright that the camera struggles to make out my face. In the winter I sometimes use the sunshade blind and it doesn’t cause a problem, as the light is at a lower level. So, the first thing to look at is whether you have blinds or curtains that can control the natural light. Again, experiment before the call.

What you are after is even lighting of your face that is not so bright that it makes you squint. This means that ideally you want light from both sides of your face. For example, a couple of desk lamps would work, one on either side.

Try to avoid lighting just from above you, as it creates shadows that are not flattering! If you have no other option, it might be worth experimenting with either white paper or foil on your desk to try to reflect some light into those shadows.

I have a photographic reflector that I use (essentially a metre-wide foil circle with a rim that keeps it taut). I tuck this behind my monitor so two-thirds of it sticks out above and leans towards me. On a not-too-bright day I use a combination of my desk lamp and the light from the Velux window to bounce back off that and light my face.

Sound

Your microphone, like your camera, has sophisticated software behind it that helps to isolate your voice from other sounds. Generally, this is the default setting in most software, but you can help it along by making some good choices.

The first thing to think about is: how noisy is the room you are in? If it is noisy, can you move to a quieter room? (Apologies if you’ve just carefully crafted your lighting set-up!) There may be other things you can do like shutting doors or windows, too. The more noise you can exclude, the less work the software has to do to eliminate the noise and the clearer you will sound.

Once you are happy, open your remote work software and find the microphone settings. There is a microphone level indicator, which is a bar or series of dots that go up and down in response to what the microphone picks up. If you speak in your normal voice while facing the microphone this should bob up and down between about 50% and 90%. If the levels fall much outside this then the program may have a microphone volume or sensitivity control you can adjust. If not (for example in Skype) the system controls are used. In Windows this is in Settings > System > Sound. It is worth checking this before any call.

When you work from home and use video and audio calls, remember that you are not in a studio where everything is well controlled and consistent. The conditions at home (noise and lighting) will change from day to day and hour to hour, so you need to look at look at how things look and sound before a call. As I mentioned above, most of the things I’ve mentioned can be done for little or no cost. Have an experiment – and please share any tips of your own in the comments below or on the CIEP Forums.

About Andy Coulson

Andy Coulson is a reformed engineer and primary teacher, and a Professional Member of the CIEP. He is a copyeditor and proofreader specialising In STEM subjects and odd formats like LaTeX.


About the CIEP

The Chartered Institute of Editing and Proofreading (CIEP) is a non-profit body promoting excellence in English language editing. We set and demonstrate editorial standards, and we are a community, training hub and support network for editorial professionals – the people who work to make text accurate, clear and fit for purpose.

Find out more about:


Photo credits: header image by Kampus Production on Pexels, person on video call by Karolina Grabowska on Pexels.

Posted by Harriet Power, CIEP information commissioning editor.

The views expressed here do not necessarily reflect those of the CIEP.

What’s e-new?

By Andy Coulson

At the time of writing this I am in lockdown at home and realising the changes and compromises this means. Thinking back to when I started, technology has evolved so much that it has helped with these challenges in a way I couldn’t have imagined 15 years ago. So, I’ve compiled a list of technology-based or focused resources that I hope will prove of some help.

1. Help! How do I fix my computer?

I suspect this may be something we will all come up against sooner or later. The good news is that there are lots of good resources that can walk you through common problems. Even if your PC or Mac is down you can search on a smartphone and hopefully get yourself running again. Sites like wikihow.com; helpdeskgeek.com; dummies.com; techrepublic.com and Microsoft’s own answers.microsoft.com and support.microsoft.com are all helpful.

A carefully thought-through Google search will often be the best approach. For example, ‘Word 365 normal template’ gives good answers as to why Office 365 keeps flagging the normal.dotm as corrupted. It contains the version of Word and the specific item that is causing the issue. If your computer is giving a fault code or description, include that in the search too.

I’ve written before about backing up, spring cleaning and virus scanners, and all these tips and tools are still relevant. I’ve recently been pointed towards Microsoft’s Safety Scanner, which is an additional, occasional-use virus checker. It is good if you suspect you have a virus, as you can download and run a clean copy of the scanner (if you do have a virus, that may have compromised the scanner on your system).

Finally in this section, Microsoft Word itself is a prime cause of the air turning blue around my workspace. Again, Microsoft’s own support pages can be really good – support.office.com. Our own forums are also a good source of support (forums.ciep.uk), with many experienced word-wranglers being regular contributors. One of my favourite sources of help to answer ‘how to’ issues in Word is wordribbon.tips.net/index.html, and it is well worth subscribing to their newsletter.

2. Managing your time

While I’m at home I find I am facing two opposite problems with managing my time. The first is that it can be difficult to focus and stick at what you are doing. The second is the polar opposite of that: using work as a distraction and spending too long nose to screen. But we can use technology to help in both cases to nudge us in the right direction. I’ve written in the past about approaches based on the Pomodoro technique, which encourages you to keep going for a fixed amount of time, or conversely take a break from work after a fixed period of time. The suggestions here are two examples on that theme.

Forest is an app that tries to help you focus by making a game of focusing on a task. You set the timer for as little as 10 minutes through to 2 hours. Each time you start a stretch of work the app plants a virtual tree. Complete the stretch and you start a forest. Quit and your tree dies. It’s a simple idea and strangely addictive. You could use this either to build up your focus or to remind you to take a break.

Workrave is aimed at helping people recover from RSI, but is also a useful tool to encourage you to take breaks from the keyboard and mouse as you work. It produces gentle reminders, which you can configure, to take frequent microbreaks and longer breaks to step away from the computer, and you can even set a daily maximum.

3. Staying fit

Keeping healthy is one of the key things we are being encouraged to do, and there is a massive number of resources that have been made available in response to the lockdown. YouTube is a particularly good resource, and all the suggestions below can be found there.

Normally I’m a keen swimmer and cyclist, but am not getting very far (yes, pun intended!) with either at the moment. However, the Global Triathlon Network has a number of very accessible workout suggestions, despite the elite-sounding name.

If you have kids at home (or even if you don’t), Joe Wicks’s The Body Coach TV channel has a regular PE-with-Joe session. He also has a range of other home workouts that need little or no equipment and cater for a range of abilities.

Yoga is another home-friendly exercise, and I find it also helps undo the damage done by sitting in front of a computer for long periods. Yoga with Adrienne and Five Parks Yoga both offer a range of sessions, from basic, short beginner sessions through to longer, more advanced sessions. Headspace have also put a series of Move Mode sessions on YouTube, which are not traditional yoga, but more a meditative approach to movement.

Finally, I’ve really got into meditation as a way of having a break from everything. Headspace, Mindspace and Calm all have a range of shorter (10-minute) meditations freely available on YouTube. I am particularly enjoying some of Headspace’s Meditations from the American National Parks where you are encouraged to focus on sounds or colours instead of your breath.

I hope that is helpful to you. Stay safe, and we’ll hopefully get back to some more techie stuff next issue.

Andy Coulson is a reformed engineer and primary teacher, and a Professional Member of CIEP. He is a copyeditor and proofreader specialising In STEM subjects and odd formats like LaTeX.


‘What’s e-new?’ was a regular column in the SfEP’s magazine for members, Editing Matters. The column has moved onto the blog until its new home on the CIEP website is ready.

Members can browse the Editing Matters back catalogue through the Members’ Area.


Photo credits: Forest – B NW; keyboard Christian Wiediger, both on Unsplash

Proofread by Liz Jones, Advanced Professional Member.
Posted by Abi Saffrey, CIEP blog coordinator.

The views expressed here do not necessarily reflect those of the CIEP.