Tag Archives: Microsoft Word

Talking tech: Clipboards

In this month’s Talking tech column, Andy Coulson looks at getting the most out of your clipboards. There’s more than one, for a start, and they include several tools and functions you might not have known about.

We all use the clipboard frequently: that useful little bit of temporary storage that allows you to copy a bit of text and repeatedly paste it into a document can often simplify repetitive jobs. However, a recent job that meant adding a lot of tags to the text to tell the typesetter how to style the paragraph, like <A> to flag that the current line is an A head, really highlighted the limitations of this and got me looking at whether there might be better ways to do things.

Office clipboard
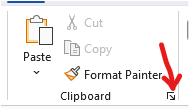
Arrow in clipboard section of WordIn Windows there are in fact two clipboards if you use Office, as that has its own clipboard. The Office clipboard lets you review the last 24 items stored to it. You can access this by clicking on the little arrow in a box in the Clipboard section of the Home ribbon in Word (indicated by the red arrow here).

You then have a sidebar that gives you access to up to 24 items on the clipboard. You can click on these and paste them into your document. When you get to 24 items the next item you copy goes to the top of the list and the bottom item is removed from the list. This means if you are repeatedly using items then your regularly used items can drop off the bottom of the list. Closing all Office programs will also empty the Office clipboard, so if you are doing something like tagging, it is worth keeping a Word or Excel Window open to preserve your clipboard list.

If you are using the clipboard to rearrange text, there are a couple of ways of working around this problem by bypassing the clipboard and keeping its content intact. The first of these uses the mouse. Select the text to move with the mouse by left-clicking and dragging, then move the mouse to where you want to move the text, hold the Ctrl key and right-click once where you want the text to go. Your text will pop up in the new destination. You can also drag the selected text by keeping the left button pressed while moving to the new location.

The other tool is the spike (named after the old-fashioned spike often found on editors’ desks). This allows you to collect several bits of text from the document and put them elsewhere in the document, or in a new document. Imagine you need to rearrange some paragraphs, clipping lines from two or three places to create a new paragraph. Spike will paste all the items you collect as a single block of text, so you need to think about the order you collect the text in. The first item you clip will be the first item in the pasted text and so on. So, you select the first item and press Ctrl+F3. This cuts the item to the spike, but if you want to copy, just press Ctrl+Z after: the item is still on the spike, but remains in its original place too. When you have collected all the pieces you want, place the cursor where they are going (or open a new document) and press Ctrl+Shift+F3 to paste all the items.

Someone typing on a laptop

Windows clipboard

Windows also has a clipboard that operates in a semi-detached fashion from the Office clipboard. Historically this also had a clipboard history tool which disappeared at some point, but is now back in Windows 11. It can be enabled by going to Settings, System, Clipboard and turning ‘Clipboard history’ on at the top of the list. Ctrl+V will then bring up the Windows clipboard history.

You can paste directly from here into Word, and this material is saved even when your Office programs are closed. You will notice, if you have Office clipboard open, that the items copied from the Windows clipboard appear in the Office clipboard. This can be a bit confusing, and I’m not entirely sure about the rationale of having two clipboards – I’m assuming it is for compatibility with the Mac version of Word.

Windows 11 clipboard history

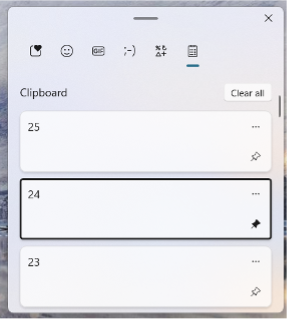
The Windows 11 clipboard history (shown here) has a couple of potentially useful tools. Firstly, you can see that there are various icons across the top. Perhaps the most relevant is the symbols one, second from the right. This is like the ‘Insert Symbol’ command, giving access to all the available symbols for the current font. The other is that you can pin items to the clipboard, by clicking on the little pin to the right of each item (24 in the list in the image is pinned). These are saved until you clear them and are saved in addition to the 24 items in the Windows clipboard, although if you paste into Word they will take up one of the 24 slots in the Office clipboard. You can use this as a way of saving regularly used items (like my tags) and bringing them back into the Office clipboard when you need them. You probably won’t be surprised to learn that there is a macro that does something similar, and I’ll touch on that below.

Useful macros

One particular macro, CopytoClipboard, was discussed on the forums here – contributed by James Baron with a bit of refinement from Paul Beverley. What this does is let you create a Word file and, with the Office clipboard sidebar open, it will populate the clipboard from the file. This is what I ended up using to tag my file. If things dropped off the bottom of the list, I could clear the clipboard and reload from the file. It meant I had a list of tags I could click on to insert, and could import with the correct formatting.

It is also worth looking at Paul’s FRedit macro (or Windows Find and Replace if there are only one or two patterns) to see if there is a pattern you can find to do the pasting or formatting for you. In my tagging example, if there had been numbered headings, you could potentially have searched for heading styles or the pattern of numbering and added the tags automatically. Even if that was only 90% correct in a long manuscript, that could still be a significant time-saving.

Clipboard extenders

Finally, there are various clipboard extender programs that add to the functionality of the clipboard. I have used ClipX in the past, but this hasn’t been updated for several years, so I wouldn’t recommend it. This allowed the clipboard to have more capacity as well as providing ‘stickies’, which were like the pinned items in the Windows 11 clipboard, but were presented in a really useful pop-up menu.

There are many others available, but going by most of the reviews, I have so far avoided trying any, as I think they may actually cause more issues than they solve. If anyone has tried any and rates them, please let me know in the comments, and we can perhaps have a round-up in a future column.

I realise I have not touched on the Mac clipboard, for which I apologise as a non-Mac user. However, the bit of reading around I have done suggests the situation on the Mac is similar. Again, if anyone would like to share their Mac experiences in the comments, we can perhaps revisit this.

To sum up, the clipboard is really several clipboards that operate in similar and overlapping ways. On Windows 11 with Office you have a number of tools for cutting, copying and pasting text that work pretty well. Things start to get a bit trickier if you have to copy and paste a larger number of items frequently – as in my tags example – where copying from another document each time is slow and creates a lot of wear and tear on your mouse hand. It is worth spending some time exploring whether there are better ways of doing this to improve your efficiency and look after your wrists.

About Andy Coulson

Andy CoulsonAndy Coulson is a reformed engineer and primary teacher, and a Professional Member of the CIEP. He is a copyeditor and proofreader specialising in STEM subjects and odd formats like LaTeX.


About the CIEP

The Chartered Institute of Editing and Proofreading (CIEP) is a non-profit body promoting excellence in English language editing. We set and demonstrate editorial standards, and we are a community, training hub and support network for editorial professionals – the people who work to make text accurate, clear and fit for purpose.

Find out more about:


Photo credits: header image by Pixabay, someone typing on a laptop by Breakingpic, both on Pexels.

Posted by Eleanor Smith, blog assistant.

The views expressed here do not necessarily reflect those of the CIEP.

The 2021 CIEP conference: Using Word styles

This year’s CIEP conference was held online, from 12 to 14 September. Attendees from all over the world logged on to learn and socialise with their fellow editors and proofreaders, and a number of delegates kindly volunteered to write up the sessions for us. Abi Saffrey reviewed Using Word styles, presented by Jill French.

Stylish editing

This session allowed people who have not yet completed the CIEP’s Word for Practical Editing course to benefit from Jill French’s calm and clear approach to explaining something that many editors, let’s be honest, are a bit bamboozled by.

Microsoft Word is packed with tools and functions that many editors never use, but styles are incredibly useful even when a client (or manager) does not ask for them to be applied to a document.

Jill explained that a style is a pre-set combination of font features (size, bold) and paragraph attributes (spacing, indents). Existing styles can be applied or amended using the Style section of the ribbon at the top of the Word window, or by expanding that into the Style Pane (by clicking on the little arrow in the bottom-right corner). As well as applying styles to text, it is possible to add ‘direct formatting’ using the Font and Paragraph options on the ribbon. Direct formatting only affects that one occurrence of the text, whereas Styles can be modified to amend all occurrences throughout the document.

Jill walked us through elements of the Style Pane, including the very useful Style Inspector. The little icon with a magnifying glass gives all the style details of a selected character, word or paragraph. Jill then moved on to cover applying built-in styles, creating new styles and amending a style. As well as looking at the font elements of a style, she covered elements of paragraph formatting, including line spacing, indents (or not) and page breaks. The latter was one of my major takeaways from this session – it’s possible to add a line break to a style; so, for example, each chapter can start on a new page if you add a page break to the chapter heading style.

Jill briefly looked at how styles can help with reordering content. Via the navigation pane (on a PC found on the View ribbon), or by clicking Ctrl+F, it’s possible to see the sections of the document under ‘Headings’. Within that pane, it’s possible to drag one heading to above/below another, which reorders the text within the document – mind blown!

To share styles, it’s possible to share a document with the styles within it, or create a template document (filename.dot) that can be used as the basis for new documents or attached to existing documents.

Jill finished the session by highlighting how Word styles can save time, keep documents under control, and make them (and you) look professional.

The session was a very comprehensive introduction to Word styles, and demonstrated the importance of using this functionality in everyday editing life.


Learn more about working in Microsoft Word in the CIEP course Word for Practical Editing.


Abi Saffrey has been tinkering with Microsoft Word documents for over 20 years.

She’s an Advanced Professional Member of the CIEP, offering editorial project management and copyediting to a variety of organisations that publish digital and printed content.


About the CIEP

The Chartered Institute of Editing and Proofreading (CIEP) is a non-profit body promoting excellence in English language editing. We set and demonstrate editorial standards, and we are a community, training hub and support network for editorial professionals – the people who work to make text accurate, clear and fit for purpose.

Find out more about:


Posted by Abi Saffrey, CIEP blog coordinator.

The views expressed here do not necessarily reflect those of the CIEP.

A week in the life of a typesetter

By Andrew Chapman

I’ll have to begin with a disclaimer: a lot of each ‘week in my life’ is currently spent as a (very) amateur home-based teacher of my two children, something I’m sure many CIEP members in the middle years of life can relate to; so this blog post instead reflects some of the variety of my work. ‘Typesetting in times of change’, perhaps!

A flexible approach

It was luck that brought me to my slightly unusual career, mixing editorial and writing work with the design side of publishing. Early in my career, I got a job as a staff writer on a computer magazine – remember the Amstrad PCW word processors? That technology was already obsolescent in the mid-1990s, but in a sense this helped me out: the magazine had a small team, so learning fast on the job, and being able to pick up how to use QuarkXPress, was an asset. A later stint on a weekly newspaper, again requiring a flexible approach, cemented my combination of editing and typesetting skills, which has kept me fed as a freelancer for more than 20 years now.

I’d say the two things that have changed the most in that time have been the software and the route to publication, which are inevitably intertwined. Quark is often forgotten these days, as most publishers use Adobe InDesign – though actually I still prefer Quark myself, and its current version is a worthy competitor once again. In practice I use both most days – although editing work is still done in Word.

Changing technology

The advent of self-publishing has had a major influence on the technology – all routes for print lead to a press-ready PDF, but ebooks have very different constraints and attributes. The holy grail of publishing is a system which is flexible, easy to use and accommodates these very different forms of output from a single source file. Both Quark and InDesign can produce ebooks, but I find they are not always very good – it depends on the book. And now there are various solutions in the mix which can sometimes make all this a simpler business – I’m thinking of Vellum (a Mac-only program which is very clever, but limited in its typesetting features), Pressbooks and other tools created by marketplaces such as Reedsy and Amazon. A new player in the print-and-ebook space is Hederis – too pricey for my taste, but one to watch.

The point of this trip down software’s memory lane is really that one has to keep up with these trends, and expect to use a variety of tools for the job – the varied nature of books and magazines means that no single tool cracks every nut. But the one thing that is guaranteed to have any typesetter in tears is a file in Microsoft Publisher format!

Varied work

Much of my career has been spent in magazines, but over the last few years I have shifted the balance of my business to books – sadly magazines seem to be in serious decline, apart from a niche market for attractive indie magazines, often marketed online. Inevitably shop closures during the pandemic have accelerated the decline of the newsstand, although the more serious enemy really is the vast range of free content online. Thankfully, books seem to be thriving, and in the lockdown months I’ve noticed a lot of authors seem to be finishing their books and looking for help in getting them out.

Being an editor who typesets, or a typesetter who edits – my sense of which I am varies day to day – means I can often be involved through more of a book’s production, which I find very rewarding. I find the two activities occupy very different parts of my ‘headspace’, too: for editing, I have to be working in absolute silence, but I can work on paper or a laptop if need be; whereas for typesetting, I typically have Radio 4 burbling in the background – I have two large screens in front of me, and now can’t remember how I ever managed with one.

I love the variety of projects which freelancing enables me to take on – although the scheduling can of course be a headache, especially when books get delayed or all suddenly come in at once. One recent project which I enjoyed being involved with was a lockdown cookery book by a Michelin-starred chef, whose son grew the vegetables the chef cooked with – so it was an interesting mix of father-and-son bonding and mouth-watering recipes, accompanied by amazing photos by a professional food photographer.

I’m something of a generalist by nature – hence the two sides to my career, I suppose – so I also enjoy not knowing what’s next: my most recent editing projects have been a historical novel, a thesis about forensics in detective fiction and a book about understanding canine psychology; and on the design side there have been business books, a short story collection and a trio of books by an established author dipping her toe in the world of self-publishing for the first time.

If there’s one subject area I particularly enjoy, however, it’s history – I’ve been the editor of a family and social history magazine for the last decade, and these days I typeset it too (of course, sometimes budgetary constraints lurk behind these decisions). And in December, I launched a related side project of my own – a weekly email newsletter presenting first-hand accounts from history, partly because I feel history publishing needs more ‘ordinary’ voices from the past rather than just famous names and royalty. I’m not really sure why I’ve forced more constraints on my complicated week – but I suppose if there’s one thing my erratic career has shown, it’s that I like a challenge.

Working together

Maybe being an editor/typesetter combined is ultimately my real specialism – hopefully I’ve got enough years under the belt now to have some insight into how the two work best together, and I’ll try to suppress the lingering spectre of imposter syndrome that whispers ‘jack of all trades, master of none …’ in my ear.

From a typesetter’s point of view, perhaps a few words of advice might be of help to other editors and the authors they work with:

  • Please don’t embed images in your Word document – or, at least, only do so for reference. Word has a habit of chewing up image files, and in any case, the typesetting process, regardless of the software used, needs images as separate files. (This isn’t necessarily the editor’s responsibility, of course, but they should always be high resolution, ie at least 300dpi.)
  • It’s fine – and indeed helpful – to mark up a Word file with styles, for example for body text and different levels of headings, though try to avoid vast numbers of them; and don’t assume that what falls in a certain way in the Word file will end up looking quite the same in the typeset file.
  • Don’t bother ‘laying out’ a book in Word, with running headers and footers, indents or paragraph spacing, and so on: all this will be lost or changed anyway. When a Word file is imported into InDesign, say, the distinctions between styles can be preserved as well as formatting such as bold and italics, but most other things are likely to change. Ultimately the key thing is that the file distinguishes things semantically: the content is sacred, but the form will change.

Andrew Chapman is a Professional Member of the CIEP, as well as a member of the Publishers Association, the Alliance of Independent Authors, the Society of Authors and the Independent Publishers Guild. When not joining associations, he runs Prepare to Publish with the help of some fellow freelancers. His latest side project, the Histories newsletter, can be found at www.gethistories.com


Photo credits: letters by Amador Loureiro; spinach by Sigmund, both on Unsplash

Posted by Abi Saffrey, CIEP blog coordinator.

The views expressed here do not necessarily reflect those of the CIEP.

Making the most of Microsoft Word

By Alison Shakspeare

It’s a fierce world out there, particularly for freelancers, and freelance editors need to make the most of every second when their hourly income rate depends on it.

Although ‘other software is available’, Microsoft’s Word is still the go-to writing program across the English-speaking world. Therefore, maximum familiarity and minimum ineptitude have got to be good things – and those are on offer through the CIEP’s Word for Practical Editing course.

I’ve been using Word since expensive new IBM PCs were gingerly invested in by my then-employers. There was no money for training and an infant worldwide web, so when you had a query it was a case of wading through cumbersome, incomprehensible manuals or picking the brains of those who’d been using it for longer. So, over the years I’ve gradually absorbed and researched ways and means of improving my knowledge and use of this ever-updating, universal software – but it’s amazing what you fail to pick up on if you jog along on your old familiar track.

You can tell the course has been written by practising editors because it acknowledges the numerous approaches to editing tasks. Therefore you don’t feel that there is only one way to use the program or to find and use the tools. The course uses screencasts as well as documentation, so you can absorb the information in the way that suits your brain best. And when you’ve finished you end up with the study notes, exercises, model answers and a range of useful resource downloads to refer back to.

What Word for Practical Editing is not is a beginner’s guide to using Word. You do have to be a user, and you do have to know your way around the basic conventions and tools, or you’ll find yourself floundering in a sea of unfamiliar terms.

What Word for Practical Editing does do, which may be unexpected, is widen your knowledge of working in the editing world in a business-like manner and of dealing with clients.

Whether you use a PC or a Mac, this course is for you if you want to:

  • extend your knowledge on approaching a project, beginning with the client brief before you approach the Word manuscript and tips on setting up the program and its tools, and different ways of viewing it
  • improve your ability to find errors and inconsistencies – not only are you told how to use the inbuilt Find & Replace (F&R), Spelling & Grammar and Macro tools and are referred to some great add-in programs, but you are also given a useful list of common errors any editor needs to be sure they are clearing up
  • clearly communicate your findings with your client – from checking the compatibility of your Word versions, to being sure that what you receive matches the brief, to different ways of showing Track Changes; you are also given useful templates for a stylesheet, an invoice and a feedback form
  • check that you are using styles and templates as effectively as possible – there are several layers to using these universal bugbears, and if every Word user were sent a copy of this information the air might be less blue
  • widen your knowledge of shortcuts – and you can download a useful list of them to keep referring to until they become second nature
  • gain insights on archiving and CPD, because jobs aren’t always done with once you’ve sent off the edited Word doc.

I will probably not end up using all the shortcuts the course introduced me to, even though they save on keyboard time and could even ward off RSI, but I’ve certainly expanded my knowledge of what Word offers and tightened up my use of it – and therefore increased my hourly income.

What more could you want?

Alison Shakspeare came to editing after a career in arts marketing and research for leading national and regional organisations. Her client base has expanded as her skillset has grown from basic copyediting to offering design and layout services. She truly enjoys the CPD she gains from working with academics, business organisations and a growing number of self-publishing authors.


Photo credit: Love to learn by Tim Mossholder on Unsplash

Posted by Abi Saffrey, CIEP blog coordinator.

The views expressed here do not necessarily reflect those of the CIEP.
Why macros deserve pride of place in your editing toolbox

This year’s CIEP conference was held online, from 2 to 4 November. Attendees from all over the world logged on to learn and socialise with their fellow editors and proofreaders, and a number of delegates kindly volunteered to write up the sessions for us. Christina Petrides reviewed Macro-driven book editing, presented by Paul Beverley.

Paul Beverley at the 2019 SfEP conference.

If you are a macro newbie, as I am, you may have thought that this session wasn’t for you. But any time the Macro King – as introduced by Beth Hamer – holds a session, I find it’s worth listening in.

With the myriad of editing tools that are out there, we begin to dabble in macros as we find our editing feet. Most of us know the power of the macros that Paul has written – DocAlyse and ProperNounAlyse, to name just two. Now if – again, like me – you found those to be a revelation for your editing work, you’re in for a surprise.

Paul’s session was less ‘what to do’ to improve your editing efficiency but more ‘this is what you could be doing in the next two to four years’.

Every stage of editing could be macro-assisted. Macros don’t replace skill and intelligence, but can take over the boring bits, pay better attention than you, and allow you to enjoy editing the text.

The hour-long session was fast-paced and full of information. Paul began by putting macros and their power into perspective. There are currently 794 macros available in his book and 25 hours of tutorials on his YouTube channel. Of those, 16 are dedicated to FRedit, which even has its own manual, demonstrating the power of FRedit alone. From its beginnings in the 1980s, FRedit has been evolving in Paul’s expert hands into what it is today.

So when the Macro King says he wants to inspire us into using more macros to make our lives easier (not put us off), it’s worth hearing him out.

New macro users are told that Paul focuses on three types of macros. They cover analysis, making global changes before you start and making changes as you read – all expertly covered by Karen Cox’s earlier session.

As user experience and understanding grow, so does the ability to use macros effectively. Paul broke them down into an additional ten ways in which they can assist us editors in our work:

  1. instant information gathering (counting things, searching the internet, checking references)
  2. speed navigation (searching, comparing, moving around the text)
  3. list handling
  4. file handling (combining/splitting files, converting a whole folder to PDF, accepting Track Changes)
  5. comment handling (creating comment and query lists)
  6. highlighting and colour handling (adding or removing)
  7. figure and table handling (adjusting/stripping out spacing)
  8. formatting (making and using list styles, changing styles, finding ‘funny’ formatting, copy/paste formatting, formatting equations/lists)
  9. note handling (converting to text, re-embedding, correcting formatting)
  10. reference handling (checking/correcting citations, adjusting format, checking alphabetisation).

Paul then quickly demonstrated many of these macros in action on real files.

If this has got you quaking in your editing boots, take a step back. Pick one or two macros to start with and get comfortable using those. Start with the analysis macros, then add to your macro toolkit as your skill and experience grow.

What seems frightening and insurmountable can soon be second nature, and a whole new world of editing can open up. Take it slowly and you may soon be creating your own macros!

Christina Petrides is an Intermediate Member who recently discovered the power of macros. She turned to editing and writing after a career in environmental consultancy, which she still dabbles in. She focuses on business and academic work, although will work on almost anything non-fiction. Travel is her other great love, and she’s often working on the road and blogging about it.


If you’re taking your first tentative steps into using macros, do check out the summary of Karen Cox’s Macros for beginners session.


CIEP members can download a Getting started with macros fact sheet from within their members’ area.


Posted by Abi Saffrey, CIEP blog coordinator.

The views expressed here do not necessarily reflect those of the CIEP.

Taking the mystery out of macros – one click at a time

This year’s CIEP conference was held online, from 2 to 4 November. Attendees from all over the world logged on to learn and socialise with their fellow editors and proofreaders, and a number of delegates kindly volunteered to write up the sessions for us. Kate Sotejeff-Wilson reviewed Macros for beginners, presented by Karen Cox.

At Conference Aston, for the 2019 CIEP conference.

Earlier this year, in a Saturday workshop with Paul Beverley, I enthusiastically learned how to use macros, but I still wasn’t integrating them into my daily editing work – despite knowing that macros can do things other software like PerfectIt can’t. So, this was a nice refresher session that I’d recommend to anyone who loves words but finds numbers and computer code slightly terrifying.

Learning macros is a bit like learning to touch type. It takes some time, but once you’re up and running, you will save yourself far more time (and money, as you will be able to edit faster). Karen clearly explained how Paul Beverley’s macros work, with Paul on hand to delve into the details.

A macro is a set of instructions to get your computer to do something for you. They do ‘subroutines’, or small repetitive tasks. Paul divides his into three main types: analysis, as-you-edit and global.

Analysis macros produce reports on your text. You can use the reports to spot inconsistencies and make decisions to incorporate into your style sheet. Run each macro, save the report, and change the document yourself or run other macros to do it. Karen introduced her top three of Paul’s macros:

  • DocAlyse counts instances of spelling, punctuation and formatting (such as whether a capital letter is used after a colon). Karen showed us an example of this using a children’s book she had proofread.
  • ProperNounAlyse shows up instances of place and personal names. Karen used this recently for a novel set in Wales.
  • HyphenAlyse shows up when prefixed words are written as hyphenated, as two words or as a single word (in a self-help book, Karen found anti-depressants and antidepressants).

Two of my personal favourites are CenturyAlyse, which is great for historians, and AccentAlyse, which is great for translators.

Use as-you-edit macros to make changes as problems (like these) come up:

  • ‘CommaInDialogue is great for fiction editors.’ Said Karen. This macro checks whether a full stop is used before a dialogue tag instead of a comma, and corrects it. So you get ‘CommaInDialogue is great for fiction editors,’ said Karen. You can change this with one keyboard shortcut as you work your way through your document.
  • SwapCharacters will correct ‘sepllings’ to ‘spellings’; SwapWords will turn ‘in as’ into ‘as in’.
  • Fetch Macros (GoogleFetch, OUPFetch, GoogleMapFetch) will check how a phrase is spelled, capitalised or located.

Global change macros will change every instance of something in the whole document. Think hard before you do this. These macros need to be used with great care; make sure you save a copy of your file before you start.

  • FRedit is a find-and-replace edit; you create a script for how you want to change these globally. You can use this to do things like turn double spaces into single spaces after a full stop. You can tell FRedit not to Track Changes that you want to make ‘silently’.

Karen closed by showing viewers how to install a macro; why not go to Paul Beverley’s website and try it? You can download a starter pack and book from the site, or go to the CIEP macros forum. Paul will be there to answer your questions.

Kate Sotejeff-Wilson has been editing and translating for academics since starting her history PhD in 1999, and she is happiest in the space between languages or an intercultural setting. Born in Wales to a Polish mother and English father, she is now a Finn. Kate is an Advanced Professional Member of the CIEP and vice-chair of Nordic Editors and Translators.


If you’d like to learn more about Paul’s macros, check out Christina Petrides’ summary of Paul’s Macro-driven book editing session.


CIEP members can download a Getting started with macros fact sheet from within their members’ area.


Posted by Abi Saffrey, CIEP blog coordinator.

The views expressed here do not necessarily reflect those of the CIEP.

What’s e-new? The efficient guide to Word

By Andy Coulson

This issue of The Edit has a theme of working efficiently, so let’s take a look at how we can persuade every editor’s favourite tech tool to work efficiently.

1. Keyboard shortcuts

Keyboard shortcuts are a great little time saver. Think about what you do when you use a mouse – you move it about to try to line up a pointer on a (small) target. You then click and, depending on what you want to do, perhaps repeat this two or more times to get to your command. But with a shortcut you press two or three keys together, and away you go. ‘How-To Geek’ has a really good list.

You don’t have to accept Microsoft’s default choices, either. If you go to Options > Customize Ribbon you’ll see an option at the bottom to customise keyboard shortcuts. This allows you to set up shortcuts for any commands. You can also allocate shortcuts to macros (see below).

2. Styles

Styles offer you a way to quickly format elements of the document. However, they can be a bit fiddly to use. In Word 365, the styles appear in the Home ribbon, as well as in the Quick Access Toolbar at the top. Often you’ll find you use the styles already in the document, and you simply apply them by putting your cursor in the block of text you want to style and then clicking the style name.

But, what do you do when a client says ‘make file A look like file B’? Word has a mechanism to copy styles between documents, but it’s well hidden. You can add the Developer tab to the ribbon, which you do by going into File > Options > Customize Ribbon and selecting ‘Developer’ from the list on the left. Make sure ‘Main Tabs’ is selected at the top of the list on the right and then click ‘Add’.

In the Developer tab, click on ‘Document Templates’, and then ‘Organizer’ in the ‘Templates’ tab of the pop-up box. You will see two lists. The one on the left should have the file name of your current document underneath. On the right-hand one, click ‘Close File’, and this will clear the list, then change to ‘Open File’. Click on it and select the template or document you want to import from. You can then simply select the styles you want and click the ‘Copy’ button to import these to your document.

3. Wildcards

If you use Find and Replace, learning to use wildcards will transform your searching. These allow you to look for patterns rather than specific words. For example, ‘?ed’ tells Word to find ‘ed’ preceded by any other single character, so it would find ‘red’, ‘bed’, ‘Red’ or ‘Bed’ and so on. This can get complicated, but it can also be a real time saver. One of my favourite applications is cleaning up question numbering in textbooks where I can’t use auto-numbering. Here, searching for ‘([0-9]{1,2})\)^s’ and replacing with ‘\1^t’ would change one- or two-digit numbering like this: ‘1.<space>’ to ‘1<tab>’.

There are an awful lot of options, and one place to find help on these is Jack Lyon’s Wildcard Cookbook for Microsoft Word, which is available as a PDF ebook. I have it open in my ebook reader most of the time I’m editing in Word. Geoff Hart’s Effective Onscreen Editing also has a chapter on making the most of Find and Replace.

4. Macros

Macros are short programs that build on the capabilities of Word. They often link together a number of functions within Word to achieve a more complex task, be that something which finds information about the document, changes what you have selected or makes global changes.

Many of you will be aware of Paul Beverley and his macros, and I can’t suggest a better way in to macros than Paul’s Macros by the tourist route. This is a really good introduction to using macros, and will lead you to Paul’s amazing macro library. Once you get into using these you can really start saving time on your work in Word.

Among my favourites are DocAlyse, which runs a range of tests on a document to flag the types of issues it may have; WhatChar, which identifies any character; SpellingErrorLister, which creates a list of potential spelling errors; and HyphenAlyse, which identifies the frequency of hyphenated words (and their non-hyphenated equivalents) and checks common prefixes.

The CIEP has also produced a fact sheet about getting started with macros.

5. Add-ins

Add-ins go a step further than macros. They are programs that work within Word to add more functions. Many of you will have heard of PerfectIt, and this is a good example. PerfectIt will check consistency in the document in a way that Word’s tools simply can’t. You can install stylesheets to suit particular clients (or create your own). I recently had a job using Chicago style (CMOS), and through the forums (thanks, Hilary Cadman!) found a ready-built one that was a big help.

PerfectIt is not the only add-in you can use. I’ve talked about ClipX before, which is an add-in to Windows rather than Word. It’s a clipboard expander that allows you to see the last 25 entries in your clipboard, so you can reuse them. I’ve just discovered it too has add-ins and one, Stickies, maintains a constant list of entries. I use this a lot when I’m manually tagging a file, so I can quickly insert tags.

6. Learn Word

I’ve saved this for last, but perhaps it should be first. Invest some time in learning to use Word to its full potential, as it will repay you time and again. Many of the things above are rooted in a knowledge of how best to use Word. As you get more familiar with Word you’ll be able to customise your set-up, helping you to use it more efficiently. A great resource to help with this is the CIEP course Editing with Word. This will give you a good introduction to many of the things I’ve talked about above.

Andy Coulson is a reformed engineer and primary teacher, and a Professional Member of CIEP. He is a copyeditor and proofreader specialising In STEM subjects and odd formats like LaTeX.


‘What’s e-new?’ was a regular column in the SfEP’s magazine for members, Editing Matters. The column has moved onto the blog until its new home on the CIEP website is ready.

Members can browse the Editing Matters back catalogue through the Members’ Area.


Photo credits: keyboard – Halacious; tourist map – pixpoetry, both on Unsplash

Proofread by Emma Easy, Intermediate Member.
Posted by Abi Saffrey, CIEP blog coordinator.

The views expressed here do not necessarily reflect those of the CIEP.