Back in May 2022, Ben Dare wrote a handy beginner’s guide to macros that explains how to start using them. In this follow-up post, Ben introduces some of the macros he finds the most helpful when editing text. Fiction editor Katherine Kirk also talks about some of her favourite macros, and how she’s improved her efficiency by mapping macros to her gaming mouse.

Ben Dare
When I begin with a Word document, I like to analyse it for style and consistency issues. Handily, there are macros to look for all sorts of things, without altering my document at all: spellings of names (ProperNounAlyse); hyphenation of words (HyphenAlyse); consistency of a whole selection of style choices (DocAlyse). Each gives a report in a separate Word document, helping me to understand where possible issues are and highlighting hard-to-spot errors.
But running each of those (and others) is a bit of a faff. So my first favourite macro is MegAlyse (yes, in my head it sounds like Megatron). This macro allows me to list the macros I’d like to analyse the document with and then runs them in an organised way (as long as I’ve installed them!), and it saves the results.
At this point I’ve got an idea of systematic things that I want to change or check individually, and I want to make those changes quickly and highlight things I know I’ll want to check. To do that, the second macro I use is FRedit. This macro has many abilities (there’s a manual!), but at its most basic it runs a list of global find and replace searches that I list in a separate document. It’s easy to experiment with – you can start with a small list and get to know this macro at your own pace – but it is important to know already what you can do with find and replace, including wildcards (and there’s a recent CIEP blog on that here).
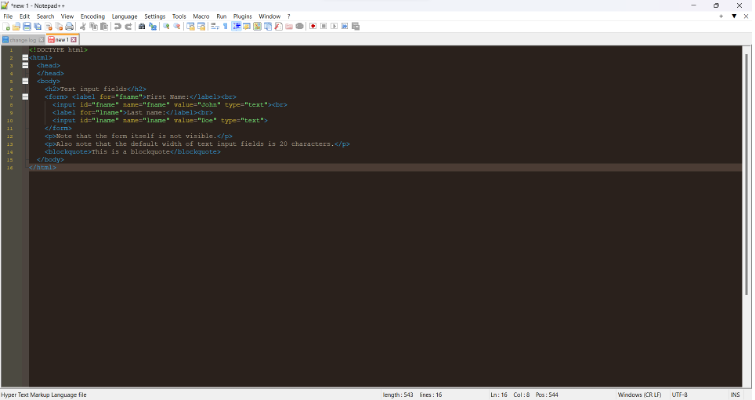
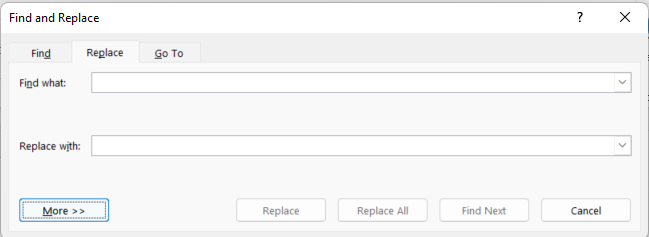
Here’s a screenshot of a basic FRedit list, each line showing a find and replace with a vertical bar | separating them:
![Screenshot showing the following five pieces of text each separated by a short vertical line: EM dash and EN dash; Navratilova with and without accents; amongst and among (highlighted yellow); Parliamentarians and ^& (highlighted green); ~[A-Za-z0-9]^13 and ^& (highlighted blue).](https://blog.ciep.uk/wp-content/uploads/2022/11/macros-1.jpg)
So with FRedit, in one go I can:
- Change all em dashes to spaced en dashes.
- Make a name always have the accents it needs.
- Change all ‘amongst’ to ‘among’ (the ¬ means it will do upper or lower case); it will also apply yellow highlighting, which is my note to self: ‘I’ve changed this but check it’ – I noticed some ‘amongst’ were in quotations and will need changing back.
- Retain ‘Parliamentarians’ (the ^& means replace with what you found, i.e. no change) but highlight in green, which tells me: ‘Not changed but needs checking for client’ – here the client wants lower case, but there were lots beginning sentences, so I’ve just marked them to check.
- Find any paragraph that ends in a letter or number, not punctuation (the ~ tells FRedit it’s a wildcard find to search for that range of characters in square brackets). It also adds blue highlight, which is my note to self: ‘Generic issue to check’.
This mixture of changes and highlighting makes things to do or check helpfully visible, but the highlighting does need to be removed. Cue the macro: HighlightMinus. Have the cursor on the appropriate line, or select some text, and the macro removes the highlighting. (Bonus mention: HighlightPlus is great for adding highlighting, to flag something for the client or that you want to come back to.)
Working through a text, some edits take a few mouse clicks/keyboard strokes to do. There are macros to do these tasks more quickly, saving seconds each time, adding up to many minutes over a project. An example is SwapWords: if the document has ‘it badly fell’ and I want ‘it fell badly’, I place the cursor in the first of the words to be swapped, run the macro, and it swaps the two words. It saves the time of manually moving or retyping text, and prevents those little slips of human error. (Bonus mention: SwapCharacters does the same for adjacent characters, handy for swapping quote marks with full stops and commas.)
I’m always reminded there’s stuff I don’t know. GoogleFetch takes the word by the cursor, or a selected phrase, and switches to a browser and searches Google (other providers are available!). It’s quick, easy and less clicking. (Bonus mention: DictionaryFetch does the same but searches an online dictionary.)
The above macros are written by Paul Beverley and are freely available to all. But many useful macros can’t be downloaded – I record them, or alter a pre-existing one, to suit my particular needs. Recording is great for repetitive, simple jobs. Altering doesn’t have to be scary: find a macro that does nearly what you want, tweak it and see what happens (on a spare doc!). For example, a client wanted me to follow the ‘Guardian and Observer style guide’ – so I changed GoogleFetch to open the appropriate Guardian style page for a word instead. It took a bit of learning, but it saved oodles of time in the end. You can even share your attempts and ask for advice on the CIEP macro forum. (Bonus mention: DictionaryFetchByLanguage came from such a process.)

Katherine Kirk
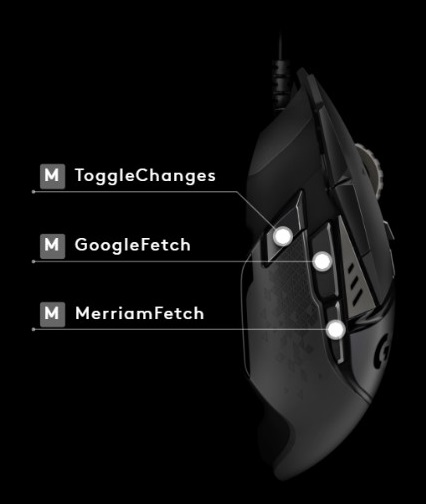
Like Ben, I use a combination of analysis macros and look-up macros, like MerriamFetch, which searches the term I’m pointing at in the Merriam-Webster online dictionary. But my absolute favourites are the ones that cut down on key combinations that I use all the time. If I can reduce a repetitive set of button pushes to a single click, then it adds up to hours of time saved, and it also reduces repetitive strain on my fingers. Even better, it frees up convenient key combinations for less frequently used macros!
The best thing I did for my efficiency this year was to get a gaming mouse. I use a Logitech G502, and as well as the scroll wheel and left and right-click buttons, it has five extra programmable buttons. I can also push the scroll wheel right or left to trigger more macros. This means I can have seven macros right there without moving my hand to my keyboard. Other editors swear by the Wacom tablet, which gives you much more functionality, but I personally love the satisfying click of the mouse buttons. Also, doing it this way eased the learning curve, which made it much less intimidating. And don’t tell my boss,* but outside of work, I use the mouse for playing games too!
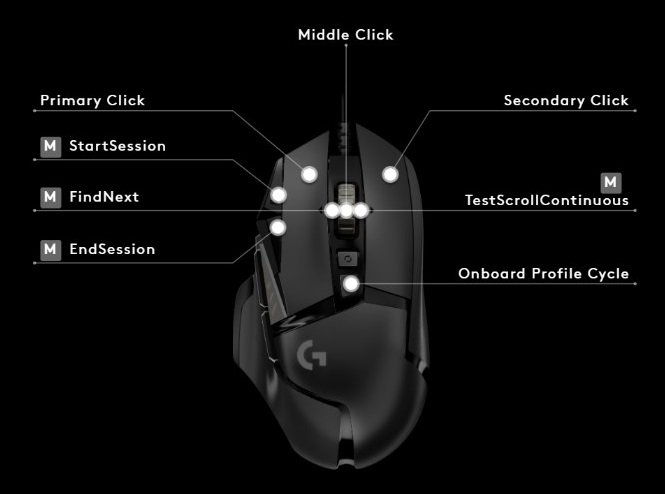
I decided to set the programmable mouse buttons up to improve my workflow. I thought about the routine button pushes I use in every job and settled on the ones that I use most often. These are the macros that have made it onto the mouse:
- StartSession does a simple search for ‘[]’ in the text, which is a kind of shorthand bookmark I’ve been using since my early days. I find Word’s built-in ‘pick up where you left off’ is a little deficient. I also use this when I need to pause my line-by-line editing to jump around for a global consistency check, so I can find my way back and carry on. I used Word’s macro recording tools to create the Start and End Session macros.
- VisibleTrackOff4 toggles Track Changes on and off, and it changes the background to yellow when it’s off so I don’t make accidentally untracked changes.
- GoogleFetch makes fact-checking quicker, since it saves me having to tab over to my browser.
- MerriamUnabridgedFetch lets me stay on top of hyphenation, capitalisation and spelling much more easily. I mostly work with US texts.
- Sliding my scroll wheel to the left finds the next instance of something I just searched for in the text. I matched it to the built-in shortcut in Word, Shift+F4, so I didn’t have to create a macro for it.
- Sliding my scroll wheel to the right scrolls down five lines and moves the cursor back up four, which keeps the text I’m working on comfortably in the middle of the screen. I don’t remember who gave me the macro for that, possibly on the CIEP forums, but they called it TestScroll.
- Finally, EndSession types my handy little ‘[]’ bookmark and saves the document, ready for the next work sprint.
Here’s how that all looks mapped to the mouse buttons. The labels with an M are macros I’ve assigned.
Besides the ones mapped to my mouse, the macros I use the most often are the ones that trim down the button pushes needed to make common changes. I work with fiction, so for me, that’s mostly things like changing ‘Yes.’ She said to ‘Yes,’ she said. I use Paul Beverley’s CommaInDialogue macro to change that full stop and capital letter into a comma and lowercase letter with a single key combination (CTRL+ALT+,).
As I explore more macros, I want to spend a little more time practising with Paul’s ‘speed editing’ macros. Minimising the time spent on repetitive little tasks means I work faster, and that makes my hourly rate go up without it costing my clients more and without sacrificing accuracy. But really, what I love most about using efficiency-boosting macros like these is that they make me feel like I’m the captain of my own spaceship. The control panel is only as complicated as I want it to be, and I can always add new magic buttons as I discover the need for them.
*I’m a freelancer. The boss is me.
About Ben Dare
 Ben Dare is a Professional Member of the CIEP and copyedits/proofreads for projects on sustainable food systems and sustainable living (and almost anything else when asked nicely). Otherwise, he’s probably playing with Lego or Gravitrax, cooking, running, swimming or (regrettably) doing chores.
About Katherine Kirk

Katherine Kirk is a fiction editor who has lived all over the world, including China, South Korea, Ecuador, and Morocco, and she’s not done yet. She works on all types of fiction for adults, especially Science Fiction, Fantasy and Literary Fiction. She is a Professional Member of the CIEP.
 About the CIEP
The Chartered Institute of Editing and Proofreading (CIEP) is a non-profit body promoting excellence in English language editing. We set and demonstrate editorial standards, and we are a community, training hub and support network for editorial professionals – the people who work to make text accurate, clear and fit for purpose.
Find out more about:
Photo credits: purple leaf and water droplet both by Pixabay on Pexels.
Posted by Harriet Power, CIEP information commissioning editor.
The views expressed here do not necessarily reflect those of the CIEP